The Flowerbed Makeover, Step 2: Painting the Foundation

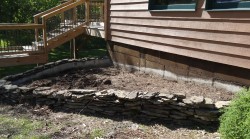
Before Restore

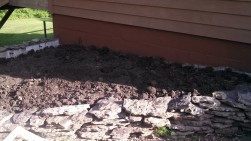
Before Restore


It’s supposed to be really nice this weekend. Like, gorgeous. Weather like this is a DIY’ers dream.

So in honor of that, I thought I’d share this terrific project idea to really give your house some Curb Appeal. Not only will YOU like the look, so will buyers if you happen to sell your house at some point in the future.

This is the flower bed after I tore out all the flowers, weeds and mulch. See how ugly that exposed foundation is?

You can see it actually has a dark color of stain on it: it had fallen victim to a failed project to stamp the wall to make it look like stone. A great concept, it just didn’t work well in reality. (Meaning, it required both of us.)

When we had the deck enlarged last summer, we had our contractor paint our exposed foundation with Restore. We just hadn’t done this part. (Honestly, I don’t think we thought about it. You really didn’t SEE it, and you know how it is when you don’t see something…)

On a recent weekend, I used our leftover Restore to paint this portion of the foundation in the picture shown below that had now been exposed.

I did not enjoy it. But I love, love, love the finished product!

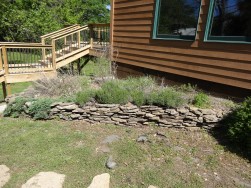
"Restore'd" Foundation

“Restore’d” Foundation


Restore makes it look a little bit like it’s been stucco’ed. It gives it a solid texture, and helps fill in cracks or small holes.  Restore is made by Rust-Oleum, comes in several colors, and is available for decks or concrete.

If you’re painting concrete,  make sure you purchase Restore for Concrete. The Deck Restore is not thick enough to stay on a vertical wall.

Behr also makes a similar product for both decks and concrete, called Deckover. It comes in 54 colors, according to their website.  Either of these should be readily available in your local home improvement store.

We have a walkout basement on our addition, so a great deal of our foundation is exposed. It required one Home Depot and two Westlake’s to get us all we needed.

It goes on very thick, so you’ll use more than you would if you were simply painting or staining the same surface. It uses special rollers to give it the texture.

It is messy.

So make sure you wear shoes and clothes that you really don’t care about. And use plastic to cover up your patio or your nice landscaping.

Here’s a tip: Because Restore requires 3-6 hours to dry, if you decide to paint one coat one day, and the second coat the next, wrap your rollers in plastic and stow them in the freezer overnight. I highly recommend tossing them when your project is complete. These aren’t rollers you’ll be using again. And, be sure to use some blue tape to protect your siding.

Ladies, I recommend wearing plastic or latex gloves to protect your manicure. Ask me how I know this. 😉

Happy Restore-ing! 🙂

PROJECT: A Flower Bed Makeover

Front Flowerbed

BEFORE

Over the years, my landscaping has taught me one thing over and over:

“Low maintenance” does not mean “No Maintenance.”

Take this flower bed for instance.

The grasses were overgrown.

Some of the plants were dead.

Some of the plants I wondered what on earth possessed me to pick THEM? What was I thinking?

Why did I let myself be talked into cedar mulch?

Why did I let it go so long?

Is it too early for a drink? (Just kidding, not really. That came later.)

It had reached the Point of No Return: the best plan, I decided, was to rip it out and start over. The “over” comes later. You’ll have to stay tuned.

I did not enjoy it.

The cool thing about being married to a contractor is the toys that come as part of the package deal. I had most of it ripped out, and Jimmy brought the backhoe and helped me with the rest.

5 years worth of plants, mulch, and landscape fabric discarded: $235

Backhoe fuel, additional black dirt, and ruined pair of shoes: $122.50

Co-Pay for back adjustment after ripping out flowerbed: $35

Having all this ugly crap gone: PRICELESS! 🙂

Project: Add An Unexpected Element

Our Back Deck

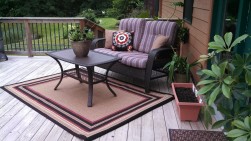
Our Back Deck

This is the last post in the series of Quick Outdoor Space Projects that was on ‘rain delay’ from the Monday of Memorial Day weekend.

I spent all day last Saturday sweeping tree debris from our decks and patio and getting them somewhat ‘beautified’ again. The stager in me gets the warm fuzzies every time I see a tidy, uncluttered space that’s balanced. And beautiful!

Every year I do something a little bit different in my outdoor living spaces. It’s good to change things up once in a while.

This year, I added a rug.

This love seat and table used to sit on the front deck, but I moved it to the back this year. In this picture, you can see my houseplants, a square pot that’s going to be an herb garden (this sat on my kitchen counter unplanted for two months, lest you think I’m too ‘Martha’!), and a color bowl that I picked up at Home Depot.

Doesn’t the rug just add a little certain something? It really gives the space its Wow Factor; I know it looks good if Jimmy actually notices!

The big bonus for an indoor/outdoor rug is that they feel like a rug, but can actually be hosed off with a garden hose! When the sun gets really strong in the ‘dog days’ of summer, I will bring it inside to prevent the sun from fading it.

And, it’s perfect to use inside if you have pets. Because no matter how well-behaved your dog is, accidents WILL happen. It’s the nature of the beast(s). 🙂


The Best Preparedness Flashlight Ever!

FlashlightSo I have a funny dog story that I’m dying to post. However, the storm we had Thursday afternoon interrupted those plans. After having the daylights scared out of me thanks to the 80 mph winds and cleanup afterwards, I was worthless the rest of the day! So thanks to the storm, you’re getting this one today instead.

I learned a good lesson after the storm we had last week: that these things can come up suddenly and with very little warning, and even if you think you’re prepared, you might not be. Our storm was in the middle of the afternoon and we never lost power, but much of Kirksville did. Some locations went hours without power, so having multiple flashlights that work can be critically important.

How many times do you go fumbling in the dark looking for a flashlight? Are the batteries fresh? Do you remember where you left it? Do you have one at your bedside? What if you’re in the bathroom and the power goes off? What if you have company and they need to get up in the night?

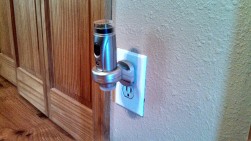
These cool little flashlights can do it all!

These little gems can be a flashlight, a nightlight, or a lantern. I honestly liked these so much, I bought 6 of them. Yes, really! I think it’s one of the best purchases I ever made. They came 2 to a pack for less than $30 (I think more like $20) at Sam’s Club. I have them in our kitchen, bedroom, our bathrooms, and our guest room, all places that can be very dark, especially at night! While I keep the ones in our bedroom shut off, the ones in the kitchen, guest room and bathrooms automatically come on when it’s dark, just like a night light.

You always know where they are. They are always charged. And you never have to fumble for one again. It’s the perfect multi-tasking tool!

Project: Add Some Bling!

An Outdoor Clock

An Outdoor Clock

I love bling. I love wearing it. I love seeing it. And I really love it in an outdoor living space.

By ‘bling’ in an outdoor living space, I’m referring to something a little sparkly or shiny or metallic that can add a pop of color and pizzazz.

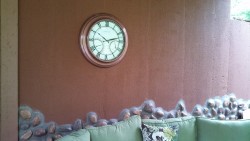
Take my outdoor clock for instance. I bought this last summer, and finally got it hung this week. It’s on my west side patio, which is underneath a deck so it has shade from the sun. The copper edging harmonizes well with the rest of my space. It also has temperature and humidity guages, which make it interesting conversation piece. I have it hanging above my outdoor sectional, which really gives it a ‘”living space” feel.

As I sit here writing this, I realize I forgot to put batteries in the clock. OOPS. Oh well. One thing at a time. 😉

Outdoor bling can be anything from a brightly colored candle in a candleholder, some neat colorful tiki torches, or colorful or shiny metallic flowers or glass globes. Even the solar ones that change color are eye candy, and are really pretty inexpensive.

One word of caution: Resist the temptation to overdo outdoor bling. Too much of a good thing is not a good thing. We’ve all seen the yards where people have gotten carried away by lawn ornaments: Your eyes are all over the place, and you can’t focus on the space as a whole. It’s like having a head full of bumblebee’s, it’s so busy! Depending on the size of your space, one or two well-placed pieces are usually enough.

The season for outdoor living is short, so make your space one that you’ll really enjoy. Happy living! 🙂

Project: Move Your Houseplants Outside!

On My Front Deck

On My Front Deck

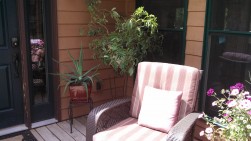
Moving your houseplants to your deck or patio can really add visual appeal to the space, making it feel more like an outdoor living room. With some plants and a few potted annuals, your outside space will have both color and a cozy, homey feel!

Once the mercury stays above 50 degrees at night, your houseplants can safely be moved outside. They need to be protected from direct sunlight, although a few early morning hours is no problem. Up next to the house or in a corner is usually the best spot. (Of course, as I write this, it is 48 degrees and raining here in Kirksville. My plants have been outside for a week, so they’ve had some time to acclimate to the temperature.)

Keep an eye on them for the first week or so; if they start to look discolored, they probably need to be moved to another spot that’s more shaded. You may have to water them more often if you aren’t getting rain periodically. During the high heat of summer, some plants may suffer if the temperature stays in the upper 90’s or higher for a prolonged period of time.

Don’t do this if you have low-light plants; they will get too much light. Which means you will have fewer plants!

Your plants will love being outside. Not only will they thrive, if they are in the right spot, but the rain will wash the dust off. It’s one less thing you have to clean! If you have several houseplants like I do, you’ll be amazed at how much it opens up your indoor space. The house seems almost bare and cooler with them outside, which is a nice change of pace for the summer.

At the end of the season (usually about mid-September), I’ll water them well and spray for bugs a day or two before I bring them in. Your plants will be cranky for a couple of weeks after coming back inside and lose some leaves, but they will adjust.  And by fall, you’ll be ready for the warmth and coziness that plants bring to your home. 🙂


Project: Great Room Color Splash

I love quick and easy home projects that are unexpected, or that add interest and freshen up a room. I also love repurposing: finding a new use for something that’s functional and not what it was originally intended for.

Colorful Sofa Pillows

Colorful Sofa Pillows

Sometimes it pays to think outside the box.

I was at Home Depot the other day picking up a few things, and saw some outdoor pillows that were eerily familiar. I have one set of deck furniture that is looking somewhat tired, and the pillows are very faded. These pillows were exactly what I needed to spruce it up for the summer!

Or so I thought. I got them home, and I was somewhat less than enchanted with the results. I brought them inside and stuck them in a corner to return later.

Yesterday I realized why I was drawn to them. Do you see what I see?

Who says outdoor pillows have to only be used outdoors? The Mattress Police?

Not only do these really add a splash of color to my Great Room, but at roughly $12 each, they are pretty inexpensive. Pillows seem to have short life spans at our house, so I am always looking for something that adds pizzazz but not at a pizzazz price. Especially when you stop to think that if someone spills something on them, you can take them outside and hose them off!

I’d say these were perfect for summer, wouldn’t you? 🙂

The Best Projects to Add Value to Your Home

House with decks

House with decks

Spring is a time when most of us start to think about home improvement projects and sprucing things up a little after a dreary winter. Completing those projects is always a GREAT pick-me-up!

Not all home projects are equal though. Especially if you’re planning to sell your house at some point in the future, some projects are going to help you out, and increase the value of your home, more than others.

Even if you aren’t currently planning to sell your home, it’s still a good idea to keep these things in mind. Circumstances change, jobs change, relationships change; heck, priorities even change! The bulk of my very informal research seems to agree that the average American owns a home for 5-7 years. (That’s average, I am well aware there are some of us who blow that statistic out of the water.)

The reality is you might be selling your home in the future even if you don’t know it yet!

The latest Cost VS. Value report from Remodeling Magazine for the West North Central part of the country (which includes all of Missouri and the states immediately west) lists the approximate addition to the value of your home per dollars spent. (You can find this, and lots of other great homeownership information, at www.houselogic.com.)

The top 5 remodel projects to return the most value to your home are:

1. Steel Replacement Entry Door – 85.6%

2. Wooden Deck Addition – 77.3%

3. Garage Door Replacement – 75.7%

4. Minor Kitchen Remodel – 75.4%

5. Window Replacement, wood – 73.3%

The worst return on your money is a home office remodel, which has a return of only 43.6%.

The bottom line is that most any kind of improvement will add value to your home, unless it’s an extremely customized improvement. Say, carving two Jedi’s out of the posts at your front door. Or having light sabers for light posts. Yeah, I wouldn’t necessarily say that would increase the value, unless you happen to find another big Star Wars fan.

And if you are selling your home, some of your improvements may not necessarily increase the amount you can ask for it, but they may well help your home sell faster. But that is another story for another time. 🙂


‘Eggs’cellent Jewelry Organizer

Egg Carton Organizer

Egg Carton Organizer

I am obsessed with finding better, quicker, simpler ways to do anything, including organizing my closets. Messy, cluttered closets are not only maddening, but also the quickest way to ratchet up my stress level when getting ready for work.

Several years ago we remodeled and added a master bath. I had a larger vanity with several drawers, and no idea what to store in them. (Imagine!) I also needed a better way to organize my jewelry. I was getting tired of digging for a matched set of earrings; I looked at jewelry boxes, but not only did I not really have the space to have one, I couldn’t find one I liked.

Necessity is the mother of invention, of course, and, inspired by an omelet one Sunday morning, the light dawned. An egg carton would make a perfect jewelry holder!

Being the home stager that I am, having a clean, uncluttered space is priority one. Therefore, I went for the clear plastic egg cartons over the regular cardboard ones.

In this picture, I’ve combined two cartons. The cartons I used had two sections with egg cups, and the third section was flat. I cut apart the sections of the second carton, and placed one of the egg cup sections in the flat lid. If you don’t have that many pairs of earrings, you can always use the flat side of the carton for bracelets or watches. You can also cut apart the sections to place them to fit your space best.

Ta Da!!!  No more searching for matched pairs of earrings, and my bracelets and watches are in one place. This super simple organizer is an easy stress reliever, and best of all, it’s free. Free rocks. Happy Organizing!