5 Quick & Easy Ideas to Perk Up Your Patio

2014-05-18 18.54.47Suddenly, the weather has turned nice, spring…and Memorial Day weekend…is finally here.

How did that happen?!

Maybe you’re hosting a graduation party this weekend, planning a barbecue, or simply just spending some time at home. Or maybe your space is small, or your deck needs staining, or a host of other little projects need completion and you’re thinking that there’s no point in ‘prettying it up’ until you get those things done.

Whatever the reason, this post is for you.

If you’re planning to entertain, you’ll love these quick ideas for brightening up your space. Lightning fast and easy to do, they’ll spruce it up and give you a lift.

And if you’re thinking simply there’s no point in doing it because [insert reason here], I disagree.

YOU are reason enough to brighten up your deck or patio and make it look nice. Think how much pleasure it will bring you to simply look outside and see a nice space! It makes whatever you’re doing outside more enjoyable. You may find you’re using your outside space even more!

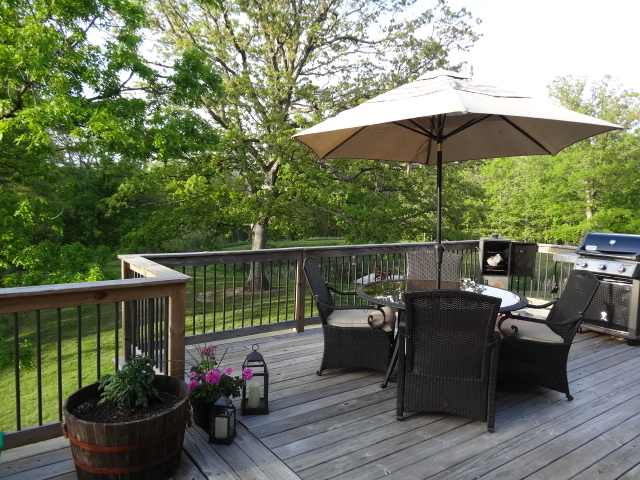
1. If you have an umbrella, open it! 

Every weekend there’s nice weather and we’re going to be home, one of the first things I do on Friday night or Saturday morning is open my umbrellas. Even if we aren’t going to be outside. Your space looks nicer, and they add a little pop of color.

Look at the difference between the picture above. Such a little thing changes the whole look. (Obviously, if a storm’s coming, you’ll want to lower your it…but otherwise, leave it open in it’s full glory!)

2014-05-18 18.55.48


2. Pick up a new mat for your front door.

2014-05-18 18.59.32
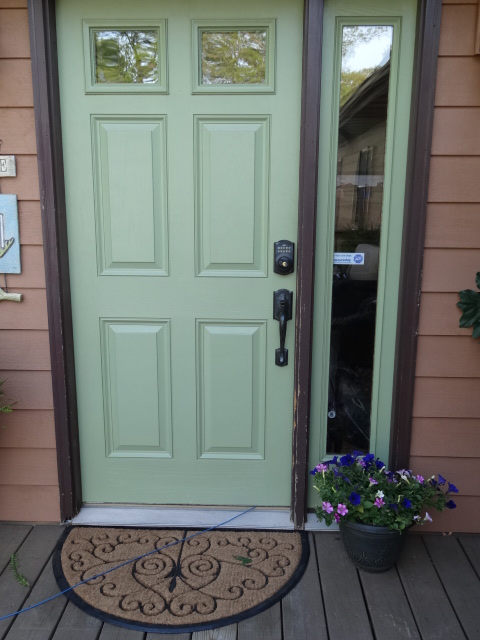
A new mat works wonders. I can’t tell you how many times I walked through the front door yesterday and smiled inside when I looked at this mat.

This mat was on the higher end price wise, but I still only spent $20.

2014-05-18 19.03.35


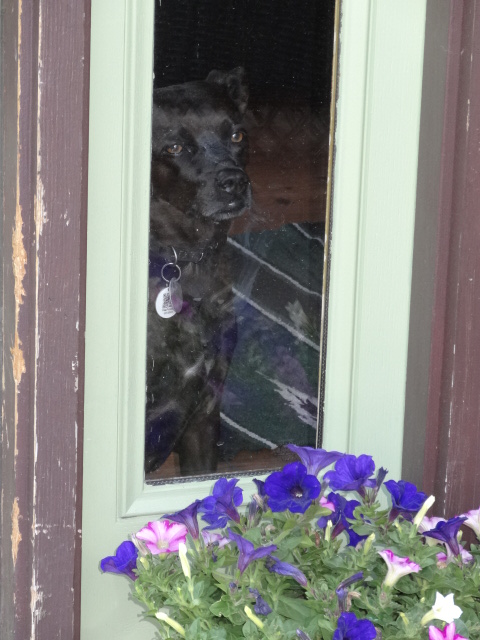
Hmmm, apparently I had supervision.

That’s her “If I really look sad, maybe you’ll let me out so I can be with you” look. Of course, it also means “when you aren’t looking I’m going to take off searching for Mr. Groundhog and deer poop to eat” so I didn’t fall for it.
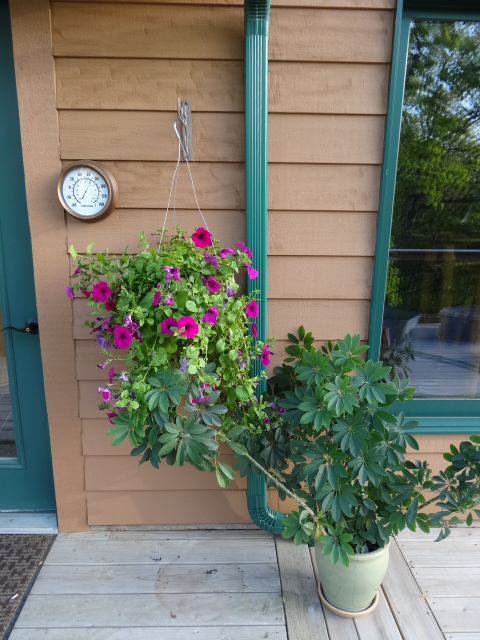
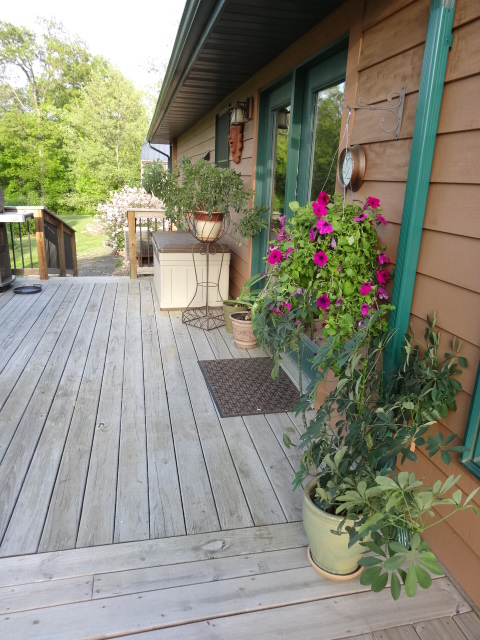
3. Add some plants.

There are several options for adding plants. Color is always nice; you can add some pre-made color bowls or hanging pots.

I picked up a couple yesterday, because I am lazy. 😉

2014-05-18 19.01.51

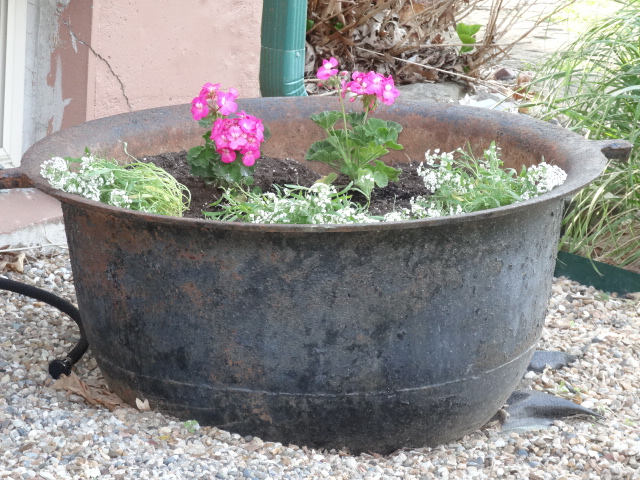
But it’s not hard to add some plants to a pot you already have. Be creative if you need a pot, and look in your garage. What could you turn into a planter? I have an old ice cream maker bucket that is someday going to be a pot.

2014-05-18 19.00.58If you don’t have the time or your budget is limited, move your houseplants outside. As I mentioned around this time last year, it’s a great way to spruce up an outside space. (Just be careful they don’t get beat with too much sun.) Up against the house is usually a good spot because the sun isn’t so harsh there.

2014-05-18 18.58.39


One of my plants and a color bowl are coexisting peacefully outside my back door.

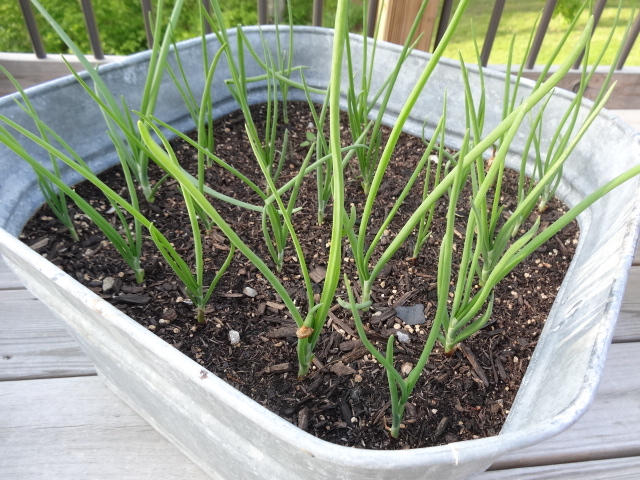
Or, plant some vegetables. This is my little ‘container garden.’

2014-05-18 19.04.38


We have too many deer around to have a serious garden, so this year I decided to do it a little differently.

We have herbs, lettuce, onions…

2014-05-18 18.58.03


and tomatoes.

2014-05-18 18.57.42


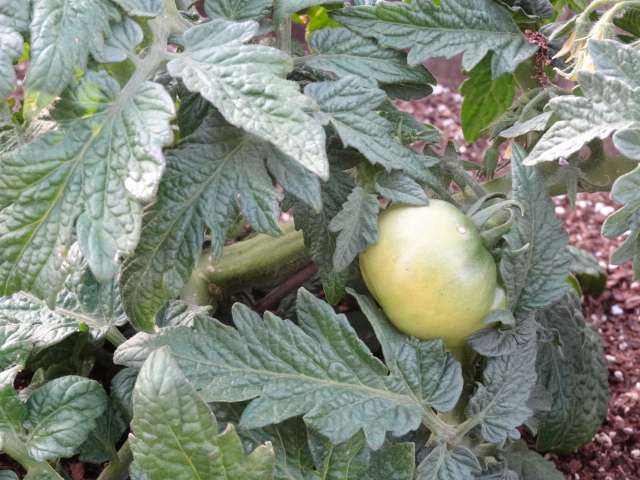
And they are all on our back deck where we can enjoy them every day.

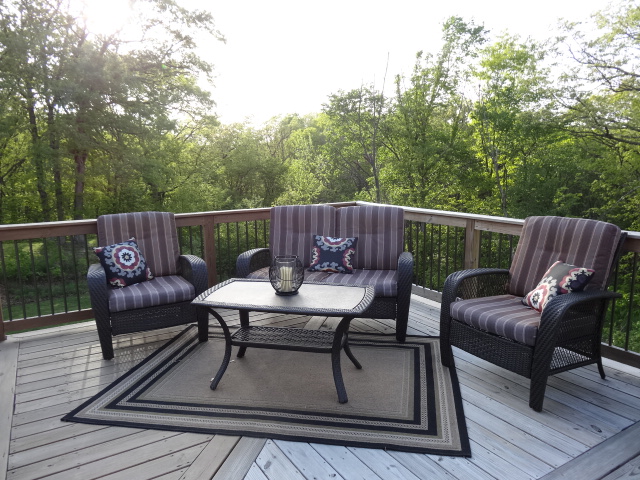
4. Add some lighting.

2014-05-18 18.55.05


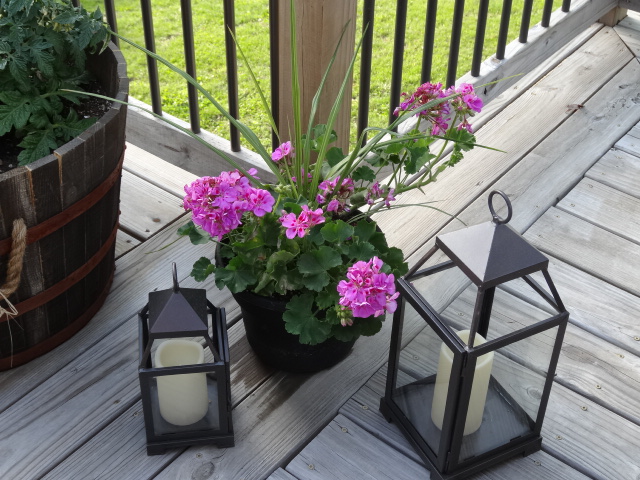
These are lanterns I bought several years ago. This year, I moved them outside from my bedroom because I was tired of them there. But if you don’t have lanterns, get creative.

String some lights around your deck, or weave them in  your plants.

No outside receptacles? Place candles in Mason jars. (Please be sure to blow them out before you go to bed!) I’m a half-wit and I know this, so my outdoor candles are flameless.

Or use some small galvanized buckets or clay flower pots to add a soft glow. Bet creative!

5. Contain your crap.

2014-05-19 09.05.32


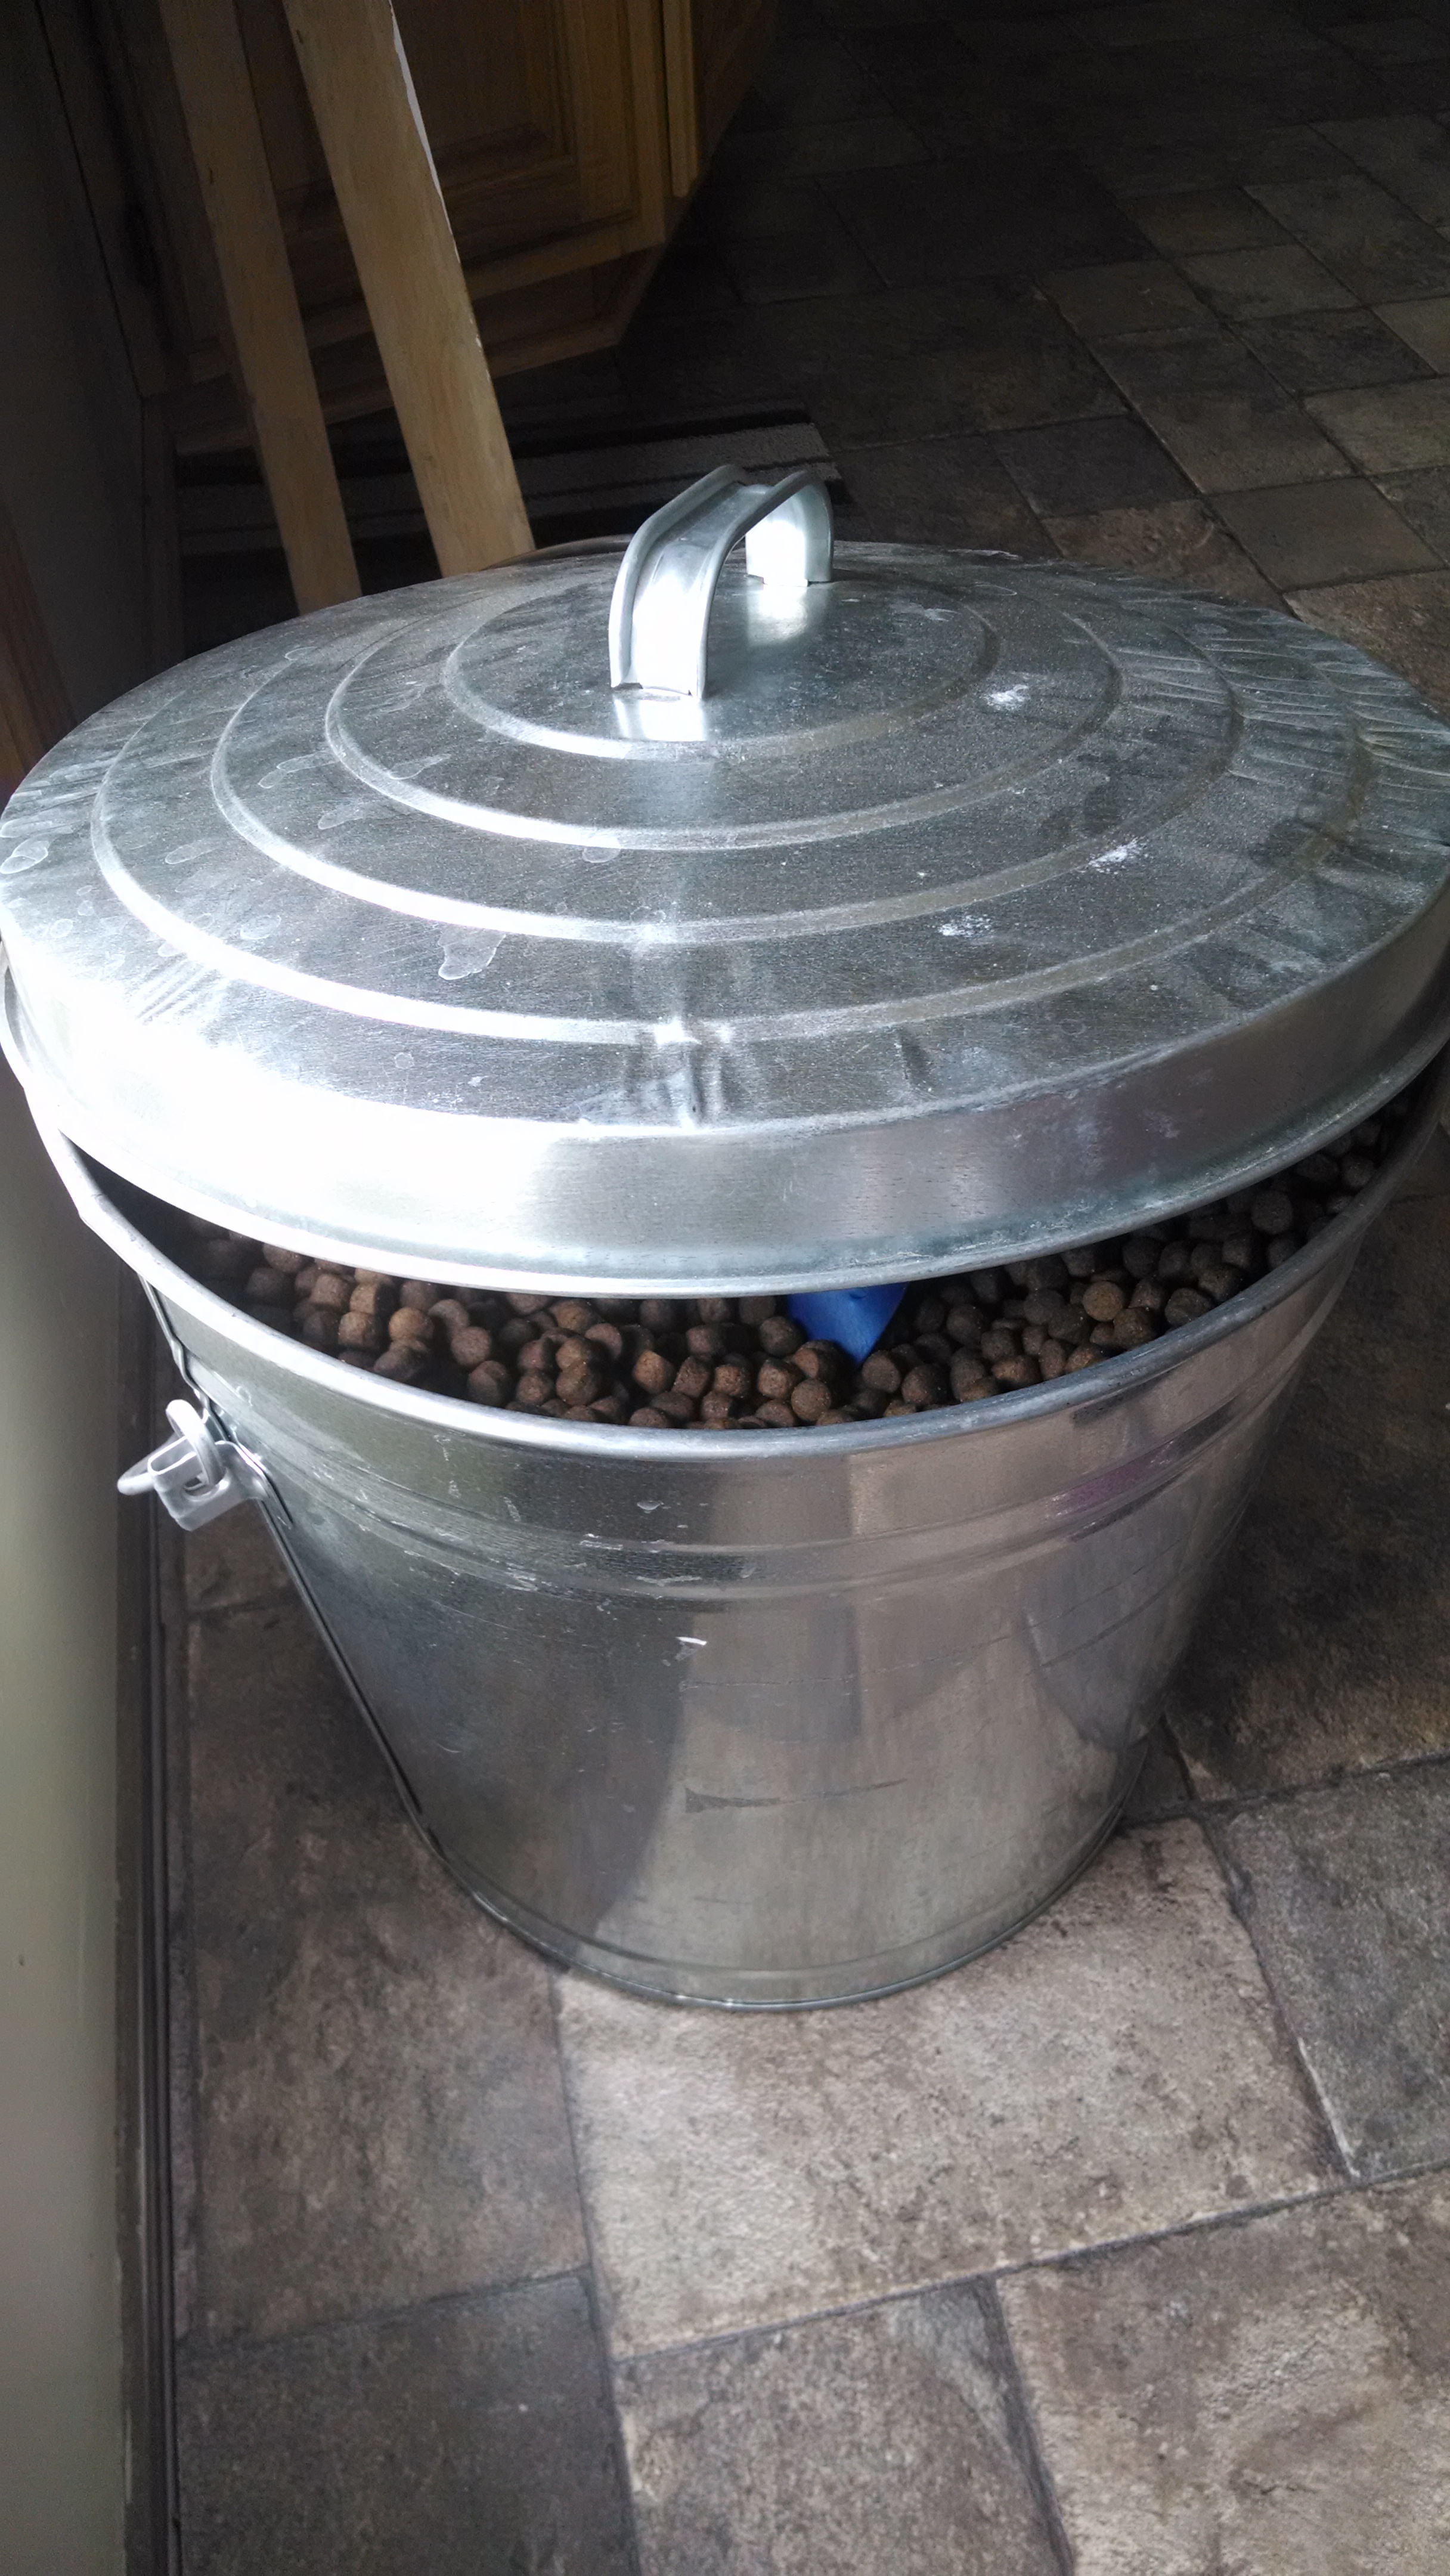
This my current favorite container. It’s simply a galvanized bucket with a lid. I picked this up for $18 at Tractor Supply. It holds a 30-pound bag of dog food, so I always know how much I have. It’s mouse-proof and rain-proof.

We bought a new barbecue grill yesterday, and if you grill much, you know that grills always require accessories. Jimmy also has a smoker, so we invariably have little bags of wood chips laying around.

I’m going to get another one of these to put all the grill stuff in to keep it dry and easily accessible. If galvanized isn’t your style, be creative. What could you repurpose to hold all your outdoor gear in? A fishing tackle box perhaps? Just containing the clutter will go a long way in making your space look neat and tidy.


2014-05-18 19.00.32

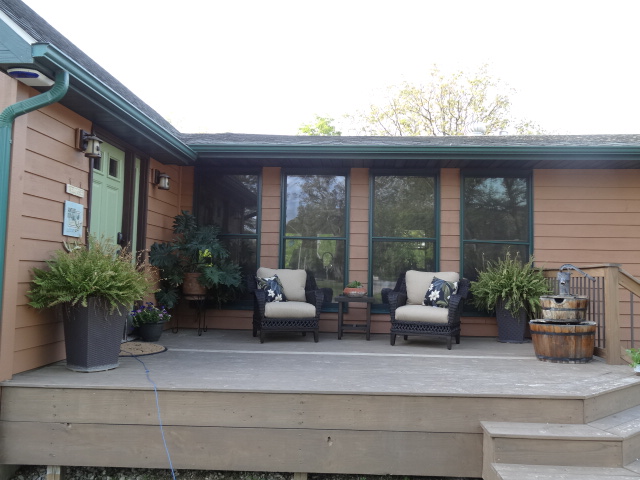
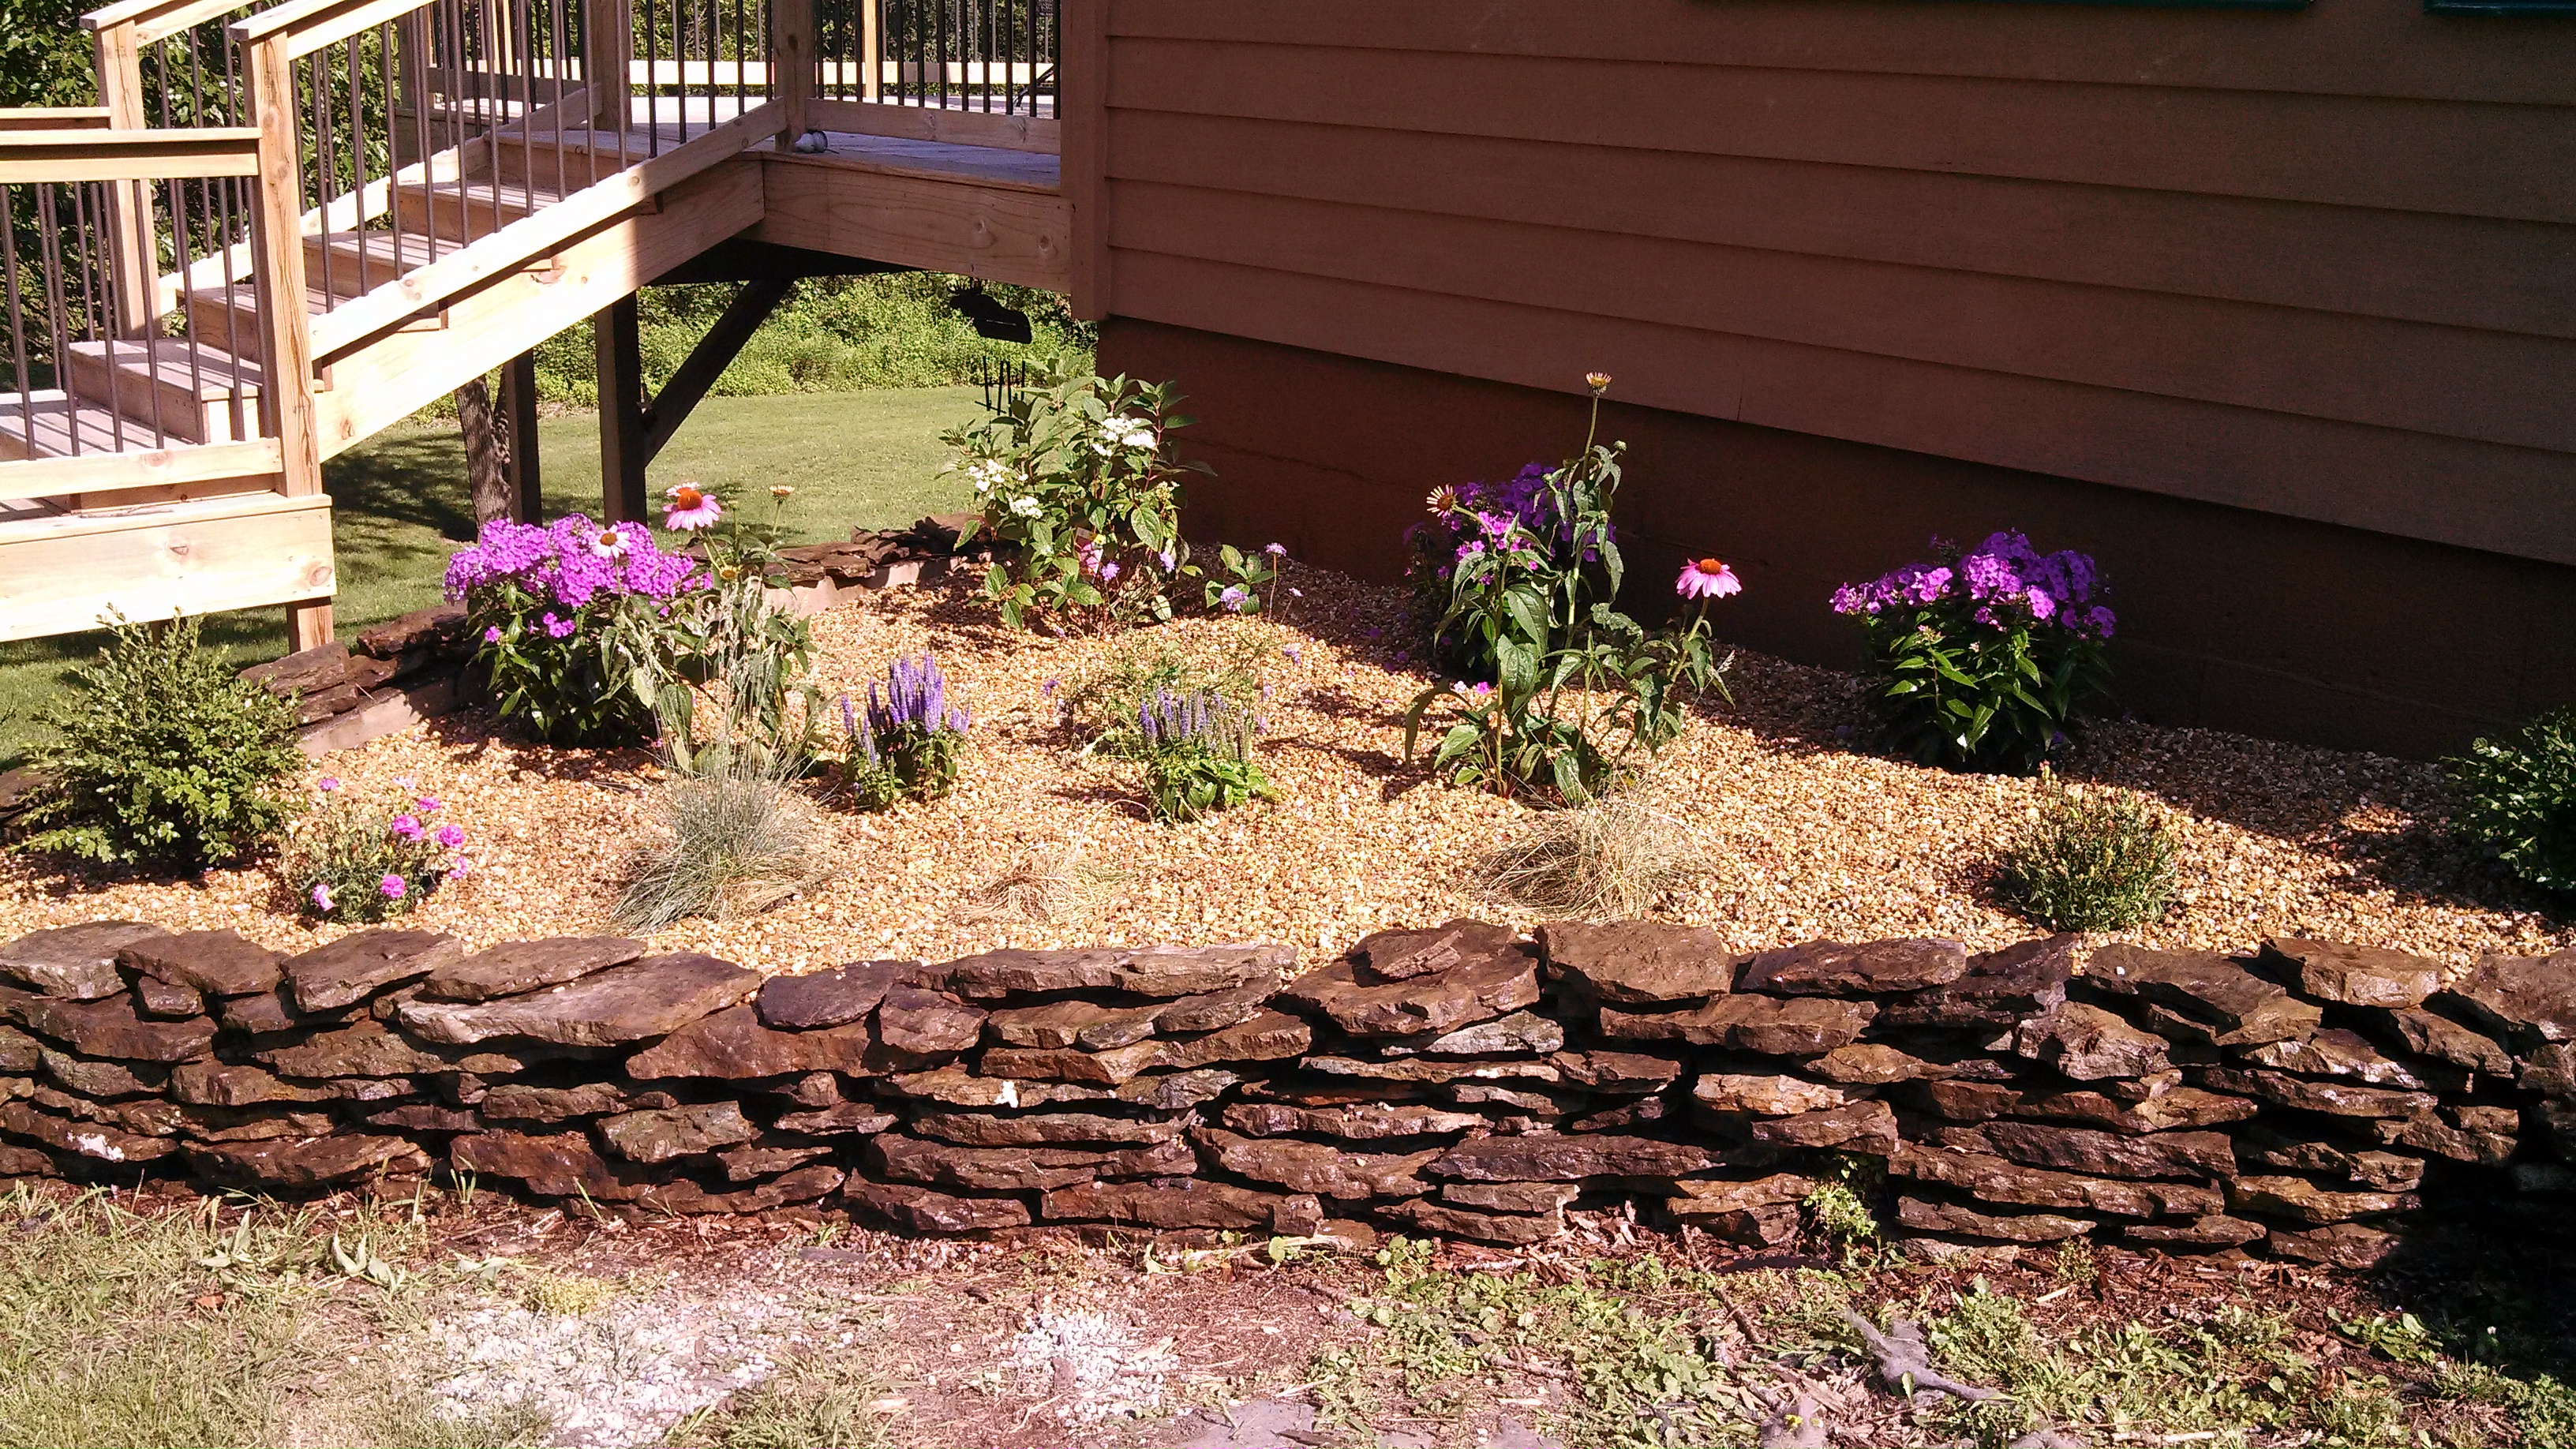
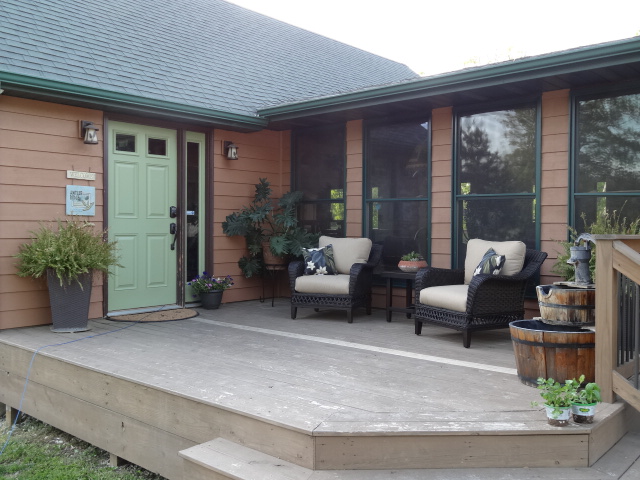
Some of you may notice that my front deck has more muted colors this year.

There’s a reason for that.

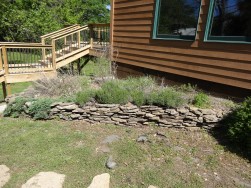
We are going to attempt to install a stone flower bed this weekend directly in front of the deck. (This has the added bonus of preventing groundhogs, skunks and other such animals from getting under that deck.)

I plan to fill it with a riot of colorful petunias, which is why I went with more muted colors on the deck.

Speaking of decks…

Don’t let the fact that your decks (or patio) may need staining or repair keep you from beautifying your space. Assuming the deck is safe for you to use, dressing it up a little bit accentuates the positive and makes the negatives less noticeable.

Yes, I am a professional stager. But I’m married to a contractor who has no desire to work at home. And while we may also be partners in a building construction business, my own projects have to wait until there’s time available.

My decks need stained.

2014-05-18 18.56.24

All of them. You can see this one is partially done.

2014-05-18 18.58.54


Home projects, like everything else, are a process.

We are really enjoying our outdoor spaces right now, and eventually we’ll get them stained. Then, we’ll enjoy them a little more. 🙂

Don’t put off living until you get everything done. Life is in the details!

“Enjoy the little things for someday you will realize they were the BIG things.”  (I have no idea who said this, but it’s on a sign in my office at home.)

Have a wonderful summer enjoying YOUR outdoor spaces! 🙂

5 Easy Tips to Organizing Your Closet


2014-04-13 11.37.50


Welcome to my closet.

While I have been blessed with many things, a large walk-in closet is not one of them. It is extra deep, so I love that part about it. It just doesn’t afford me a ton of space.

Really, I’m good with that. After all, it is human nature to want to fill up a space. I’d just end up with more crap that I really don’t need.

See, limitations CAN be good for us. 😉

So anyway, I have a routine I do twice a year to get ready for the upcoming  winter/summer season.

This routine serves several purposes: It gives me an opportunity to clean my closet and organize things where I can find them easily. (If you’ve ever head a Closet Crisis when getting ready for work which has brought you on the verge of a Morning Meltdown…you know what I’m talking about.)

Personal time, free time, is at a premium for all of us these days. Whatever the reason, so many hours of our days/weeks/months are obligated to others. It becomes increasingly difficult to find time just for YOU.

My friend Tim said it best: “I bust my [bum] to be lazy.”

Besides giving me a feeling of inner peace, the satisfaction of seeing my space organized and neat just makes me feel good. I know where everything is; I feel pleasure opening the door to all my favorite things!

This is so much better than opening the closet door and the first thing every morning that catches your eye is the outfit you bought two sizes ago with the prize tags still on it. Or that you bought for a special event 20 years ago and never wore again? Or an outfit that you bought which has bad memories associated with it.

For instance, this year I weeded out the suit that I wore to both my parents funerals. It had the added bonus of being too big, but really, do you think I’ll ever wear it again without thinking about where I wore it last? My point exactly.

And if you happen to be considering selling your house, this project has the added bonus of making your closet seem spacious to buyers. Nothing screams “This house doesn’t have enough storage space” louder than one with closets stuffed to the gills.

I’m actually proud of my closet. For a half-wit like me, who knows it and has to plan accordingly, it’s almost idiot-proof. 😉

2014-04-13 09.39.53

If you follow these tips, your closet CAN become a friend and filled with all your favorite things.

Don’t feel like you need to do all this in one sitting. I’ve done this so long that I have it down to almost a science. It’s become a ritual that I almost look forward to, closing the book on one season and welcoming the next. I can do it in a couple of hours.

But if you’ve never done it, I don’t recommend that. 

Start small. Do a little bit at a time, and eventually you’ll get it done. If you pull everything out at once, you run the risk of getting burned out or running out of time and ending up with a bigger mess than you started with. I don’t want that on my conscience! 😀

1. Examine your closet. Remove anything that doesn’t make you feel happy or feel good about yourself wearing it. (I’m serious!) Let.it.go. If you have a large closet or you haven’t sorted through your things in years, attack this task a few minutes at a time. (You can get a ton done in ten minutes! You’d be surprised.)

While I’ve read you should get rid of something you haven’t worn in a year, I admit I don’t follow that advice. I have things I love that I haven’t worn for a couple of years or more, but I still love them and they still fit.

So I prefer the “I love it/it makes me feel fabulous” strategy. If it doesn’t meet either of those criteria, get rid of it. And if you currently don’t like anything in your closet, I’m sorry. I would suggest trying it another day. Sometimes my attitude makes all the difference!

Anyway, place the things you’re purging in a bag or box. If they are in good shape, donate them so someone else can feel good in them. If they are stained or have holes, toss them. (Yes, really. No one else wants these items either!)

It’s at this point I end up with 3 piles: the “trash” pile, the “needs mending or washed” pile, and the “what the samhill was I thinking” pile. 😀

2014-04-13 10.43.46


2. Remove the seasonal items that you know you like and will wear the next season.

2014-04-13 11.16.43


Like this sweatshirt I have, for instance. I love it. But so far the only memory I have of wearing it is the day I spurted BBQ sauce all over myself. But that’s another story for another day. 😀

If you’re spacing out this project, work on this a few minutes at a time, pulling out things you love but know you won’t wear again this year.

At the actual time I did this project, there was still some chilly weather ahead. I removed all the heavy winter items, but left my long-sleeved cool weather items to wear through the transition to summer.

I already feel better, just having done this. Honestly, as much as I love some of my clothes, I just get tired of looking at them all the time! I need to be away from them to fall in love again.

3. Swap out shoes. Because my closet is extra deep, (it used to be an alcove off a hallway until a prior remodel) I installed shelves all the way up the back for my shoes. Then a couple of years ago I realized I was getting tired of dusting all my shoes off before I wore them. That was annoying.

I bought clear plastic shoe boxes, and labeled them so I could find the shoes easily. (It saves time and is less stressful.)

My scarves are folded on the upper shelves, and a box with holiday/sentimental/keepsake jewelry that I don’t wear all the time.

2014-04-13 09.38.50

Hey, Inner Peace takes work I tell ya. 😉

Because my clothes hang in front of the top shelves, I move my winter shoes up on the higher shelves, and move the summer shoes down on the lower shelves.

We don’t have a traditional dresser, so shelves along the bottom hold folded shirts and shoes I wear daily. (It’s just to the left, mostly out of sight.)

A dear friend of mine lives with several animals, and bad things periodically happen to her shoes. If you have that same problem, this would fix it and certainly lower your aggravation level. AND the cost of purchasing new shoes over and over.

Oh, and check out the super cute shoes I got recently at my favorite retail therapy spot in our downtown. I could hardly wait until it got warm enough to wear them! They are so bright they just scream SPRING!

2014-04-13 09.45.00

SQUIRREL! 😀 Sorry.

3. Clean the floor and dust the baseboards of the closet, if you can reach them.

2014-04-13 09.42.46

Well that was scary. I can promise you my dogs weren’t in this closet.

And speaking of dogs….

“There was nobody in the room when I started.”

2014-04-13 11.36.33

I have lots of help.

And look! Titan was still here, so it’s been a couple of weeks since I did this.

As you can see, he was in a supervisory position and sleeping on the job.

2014-04-13 11.36.47

4. Fold everything you are removing from the closet neatly and place it in clear totes.

I store mine in my basement. A climate-controlled storage place is best, as excessive heat may dry out elastic, but it’s not necessarily critical as long as you are careful where you store them. Just make sure everything you store is CLEAN.

This fall, when you get them out again, it will be almost like Christmas! Or welcoming old friends home again. 🙂

As happy as I was to see my spring and summer stuff (especially this year) I know I’ll be ready to see them go again when the time comes.

Within the last year I’ve begun the practice of removing and donating something from my closet I love less anytime I buy something new. Not only does it help me keep from building up an excess of clutter, it makes the purging process easier.

2014-04-13 10.01.28

5. Arrange your clothes on nice hangers.

If you are using wire hangers, purge those from your closet. Like, yesterday.

Even if you have to purchase a few at a time, invest in hangers nicer than wire. Wire hangers (like the ones that come from the dry cleaner) are not meant to leave your clothes on. They will create “hanger nipples” in your tops, will stretch out sweaters, and will leave wrinkles in your pants.

Plastic tube hangers will work, these are very inexpensive at big box stores, or the hangers that look like dress store hangers. They will keep your close nicer…and if you’re investing in clothes, you want to keep them nice for as long as possible.

I hang my clothes in groupings by color. You’ll notice I have mostly black, cream, and white, with just a few colored items. Besides being my color preference, it makes packing for a trip almost idiot proof: everything matches! And I always have shoes. 😀

If you hang your clothes sorted by color and item, it really makes getting dressed in the morning so much simpler. Simpler translates to happier. And you’ll love your closet, and your clothes again. 🙂

You’ll take on the day feeling good about yourself! And isn’t that the best way to do it? 🙂

My Camouflage Shop Shelves

2014-01-03 16.54.54It’s spring!

Spring is the season which turns everyone’s thoughts to…home projects! (Even saying it just gets me excited.) My needs are simple. 🙂

So anyway, this reminded me that I’d never shared with you my camouflage shelves I made for the shop.

The picture above is the finished product. Keep in mind a few things: like, this is the bathroom at the shop, hence the stubbed in shower pipe that doesn’t have a shower on it that you see in the foreground.

And, there’s deer antlers that are waiting patiently for their use in another project which requires power tools.

My husband doesn’t allow me to use power tools. (This is in my own best interest. Really.)

So, eventually one of the guys will help me with that particular project, and they won’t be on the floor anymore. But I digress.

These shelves began their life as crates that held oranges which, as far as I know, someone brought home from Florida. They resided in my parents basement for years.

2013-08-10 11.09.45

My mom, always the crafty sort, suggested we paint them to use as shelves in my college dorm room. During my college years in the dorm and various apartments, they were several different colors.

If any of my college friends are reading this right now: do you remember them? 😀

They moved cross-country with me to Las Vegas and resided comfortably in my garage for years.

They moved back here with me in the late 90’s, and have spent the last ten years holding my resource collection of magazines in the basement.

Until we needed shelves for our shop.

And, because it’s a shop, I didn’t want to invest a lot of money. I challenged myself to ‘shop my basement’ and be creative.

Hence, the orange crates. And, since I already had a camo lamp shade, and plans for those deer antlers, camo seemed to be the way to go.

2013-08-10 12.47.20

It really wasn’t that hard to paint them.

I just picked up 3 coordinating camo colors; the lightest color was the primary color. Then add to that the other two secondary colors; the darker of the two had the minimal coverage.

Like, in really random patterns.

They aren’t perfect, but then I wasn’t striving for perfection. After all, it’s a shelf, which means it’s going to be holding stuff.

You gotta have perspective here. 😉

What I love about these shelves is that you aren’t limited to positioning them in one way. You can position them in whatever way blows your skirt up.

At first, I positioned them in a very basic, traditional way.

2013-08-20 15.16.18

But then I decided to change it when I went to take pictures for this post. They are currently sitting like they are in the picture at the top of this post. In case you forgot, I’ll post it again. I really like this set-up. 🙂

2014-01-03 16.54.54


But you could also position them like this:

2014-01-03 16.40.08


Or like this:

2014-01-03 16.41.23

Or even like this:

2014-01-03 16.42.25I think that sort of gives it a modern look.

What about this one?

2014-01-03 16.44.20I think the look of it is really cool, but I would recommend attaching the crates to one another; otherwise, you’re going to be doing a balancing act with your stuff.

The beauty of this is you can set them up to suit your needs, or simply whatever trips your trigger!

I was happy with the way the project turned out, and they suit our needs perfectly. Even better, my husband loves them too.

And all from re-purposed junk. 🙂

I wish you inspiration, beautiful weather, and all the right paint colors!

5 Easy Tips to Organize Your Photos

We’ve finally arrived at that not-quite-spring-not-quite-winter lull that makes me restless, itching for change, and tired of the status quo. For me, this translates into the urge to organize. In the last 3 weeks, I’ve reorganized my make-up drawer, my pantry, my pots and pans, my socks, the dog food, and a myriad of other little things that escape me at the moment. While they are all very satisfying to me, I’m certain you wouldn’t be the least bit interested. 😀 But I thought you might be interested in this. 

Digital photos can be the skeleton in everyone’s organizational closet.

How many of you have 482 pictures on your SD card that you’ve never bothered to download because now it’s too overwhelming? Or have wonderful pictures on your phone of your kids, your last vacation, etc? How do you get them off your phone? What if you lost your phone? What if your hard drive crashed?

Spring means proms, dances, graduations, reunions, vacations…more and more pictures. Do you have all your pictures made into prints? What if (God forbid) your house burned?

Pictures are the priceless treasures that become the biggest loss. Material things can be replaced. Pictures, and memories, can’t. So, I’m here to help you bring order to all that digital chaos and give you Inner Peace.

At least for your digital disorder. 😉

1. Find an on-line storage system.

Some people use Instagram, and I’m sure there are others. I use Dropbox because I have other files I need to back up. I love Dropbox! (www.dropbox.com).

You receive 2G free when you sign up. You can earn free space by signing your friends up, or for $99 per year, you can purchase additional storage. And still earn free space!

I am a half-wit, and I know this, so I have to plan accordingly. I can never remember to back up files. What if I back them up, then lose whatever I backed them up on? What if my house burns down? What if I forget to back up the files in the first place? What if I’m out of state and need a file and don’t have my laptop OR my back up system?

See how my Inner Hysteria works?

(Did I mention I love Dropbox?)

I store ALL my files on the cloud. I can access my files on ANY computer. If I lose my computer, all my pictures and other files can be accessed by any other computer or my phone.

2014-03-20 12.53.52


Here’s what my Dropbox file looks like. It’s no more difficult than setting up folders in your computer’s Documents.

Dropbox is simple to use, simple to set up files, and also has an option to allow you to share pictures publicly, which is handy. For instance, when my hard drive had to be replaced last fall, the only file I lost was the ZIP file with my niece’s wedding photos, which I hadn’t unzipped and moved to Dropbox. I emailed her, and she resent them..in Dropbox. 🙂

A caveat: if you use Dropbox on your phone, make sure your phone is password-protected so your files aren’t compromised if you lose your phone. Also, never ever allow the browser to save your password if you’re logging in from a public computer.

2. DropSnap.

If you are like me, and take a lot of pictures from your phone but don’t like worrying about transferring them (or figuring out how to do it!),  you will love DropSnap. It’s an app with a one-time fee (I think it’s about $4). Every time I take a photo with my phone,  it automatically uploads to my Camera Upload file in Dropbox. (Yes! Really!)

The downside is for this to work you have to use Dropbox. That doesn’t mean there isn’t another app out there that could do the same thing with what you’re using. It just means I don’t know about it.

My poor little pea-brain (vs. pee brain, which sometimes happens ha ha) can only hold so much stuff and everything else just sort of gets squeezed out. Sort of like the pee…okay, never mind. 😀

3. Organize Your Pictures in Folders. 

I organize all my digital pictures in folders by year.

2014-03-17 09.30.52

See?  By the way, I took this picture with my phone – sorry about the reflection of the window…ooops. The picture then automatically uploaded to my Camera Upload folder, and I used my laptop to place it into this post. Groovy, eh?)

Also, it’s hard to take a picture of a computer screen up close. I think it’s something to do with the pixels. Or at least it was back in the day when I worked in TV. But I digress.

Apparently, 2006 was the year I received a digital camera for Christmas. Which I later lost at the Truman Homecoming when it fell out of my coat pocket when I was riding with my husband in a friend’s Mule and we were careening around corners.

Squirrel!

Sorry. 😀

I’ve not had any sugar, I promise. 😉

I then make sub-folders in each year of various events, vacations, etc.

2014-03-17 09.31.14


This is my 2014 folder. More folders will come as the year passes, but I’ve grouped them together to easily find what I’m looking for.

In my Florida folder, I have more folders broken down into locations or subject, such as sunsets or our visit to the Dry Tortugas.

You can get as crazy organizing as you want!

The purpose of this, however,  is to relieve stress and make it easier to find what you’re looking for. I don’t recommend getting ‘analysis paralysis’ and stressing over too many folders. Just categorize them generally.

4. Do a Little At A Time.

If you’re the person who has 482 pictures on your camera…or 3,487 pictures on your hard drive…or 12 SD cards full of pictures…this is going to seem like an overwhelming task.

I get that. I’ve been there.

Whatever you’re planning to do with those pictures, you can still do…it will just make it easier to find them, and easier for you to enjoy them more if they’re more organized. I can whip out my phone and show someone any of my pictures at any time – whether they want to see them or not! BWAH HA HA HA

I’ve been at lunch with former clients who have been talking about doing an update to a room in their house.  I can whip out my phone, pull up the pictures of their room, and boom! We’re right on the same page. (Usually.)

I will NOT be responsible for your friends avoiding you due to picture-fatigue. This is a VERY powerful tool, so please use it responsibly. 😉

Just start wherever you are! The next time you upload pictures, try organizing them. Do NOT get carried away weeding out the crappy ones! Just put them ALL in a folder for now.

The next time you’re stuck on the phone on hold, or listening to Great Aunt Mabel who likes to talk, or your husband is in charge of the TV remote and you hate what he’s watching, weed through them. You can delete the crummy ones, or go back through some of  your older pictures and organize a few more.

I wouldn’t accomplish anything if I didn’t do it a little at a time.  One baby-step at a time will eventually take you down the whole road.

“Chunking it” is the term my friend Michelle uses. Breaking up any overwhelming job into one ‘chunk’ at a time will eventually get it done. 🙂

5. Use Photo Boxes.

Picture box

I used to have about 25 photo albums. These albums took up boxes and totes, and I moved across country with them twice. They were heavy, and guess what? Rarely did I ever go back and look at them.

A few years ago, tired of all the space these albums hogged, I worked one album at a time, removing all the pictures and making files (by year/event/location/subject) in photo boxes. I think I even used shoe boxes!

Now, every paper photo I have ever taken fits into boxes in two totes in the basement. The totes keep them mouse proof and dry if the basement ever floods.

If you have kids, you can sort them into boxes per kid (what a nice keepsake!)

They take up less space, they are easier to move, and all I have to do is pull out a box, search for the year or subject, and pull out the pictures!

My next project is going to be sorting through and digitizing some of my old family pictures so I will have them forever. (That’s probably a project for next winter or the ridiculously hot summer months.)

Family photos

Recently, I took my wedding negatives in to have them digitized, after keeping them in a safety deposit box for years. I can promise you I enjoy them much more in their current format than I ever did in the album!

And if there’s a better way that works for you…fabulous! The whole point is to enjoy all those pictures you’ve taken rather than have them weigh you down.

Happy Organizing!

5 Easy Christmas Decoration Ideas

Oh Christmas Tree


Happy Friday the 13th! And if you’re reading this in the Midwest today, you know the weather is crummy. With a capital C! This is one of those weekends where most of us should probably just hunker down and lay low until the roads are cleared.

That’s probably why I had the sudden urge to go shopping. I had nothing I needed, mind you. I just wanted to go. Probably it was because I knew I shouldn’t. Or couldn’t. ha ha

Anyway, this post is for those of you who have been stressed to the gills and are feeling guilty because not only have you not done much decorating, you aren’t sure you want to bother.

Let me just say, I feel your pain.

I love having my house decorated for Christmas. I just hate doing it. And there have been Christmases past where I haven’t, usually because we were remodeling and I couldn’t face packing and unpacking more boxes!

Here’s some quick little tips to help your house look festive without doing a whole lot, and using what you have. Honestly, the smartest thing I EVER did was to bless someone else with my gorgeous but huge, heavy, and unlit tree. If you’re tree shopping, I have one word for you: PRE-LIT. I also went for a tall, but slim tree last year. And I’ve never looked back.

1. Choose a color or a theme.

New coffee table


Meet my new coffee table. SIGH. I’m totally in love with this table. This was my birthday and Christmas present from Jimmy, which just came a couple of weeks ago. He even liked it when it came and he realized it was my gift.

BAH HA HA HA HA.

The best part about it is no more lost bones or hooves underneath! But I digress.

If you’re having trouble deciding WHICH of your decorations you want to get out, don’t feel like  you need to get them all. Simplify this year.

Pick just the ornaments that are your favorite color. Or go with just your favorite ornaments. Or just the ornaments that the kids have made. Or use patio lights that already have a decorative exterior. Or simply smother the tree in lots of pretty lights and some tinsel and call it good. At night, it will be breathtaking!

Several years ago, I blessed my nieces with my “collectible” Hallmark ornament collection, all still in the little boxes, which were the biggest pain come the holidays. I couldn’t bear the thought of opening all those little boxes one more time. I’d collected them for years and was so completely over them.

My ornaments are now primarily white, silver, clear, or brown (twiggy spheres and pine cones) with “ice crystals.” And a few antlers thrown in, because we like the rustic look.

2. Lights maketh a winter wonderland. 

White lights

If you’ve ever been to the Ethel M. Chocolate Factory in Las Vegas, they have a huge cactus garden that’s drenched in lights during the winter. No ornaments. No big generator-powered yard displays. Just lots and lots of lights. It’s quiet, peaceful, and absolutely magical. And breathtaking. And not an ornament one. (Or at least there didn’t used to be.) It was always one of my favorite Christmas stops when I lived there.

You can do the same thing to your house.

If you love red lights, use all red. Blue would also be gorgeous! Lots of vibrant colors? Awesome!

Let your kids help, then turn out all the lights in the house and have dinner or even just hot chocolate with only the Christmas lights on. Wowww… 🙂

We happen to prefer white lights. There’s something clean and simple and always elegant about white lights. This year, we did manage to decorate the outside of our house with them. (We’ve not accomplished that some years.) And, no one was injured in the process, which is always a plus. 😉

More white lights

We have them around our big windows on the inside, and trailing over in front of our fireplace. Doesn’t that look nice? You almost don’t notice that I forgot to light the candles!

I have them above my kitchen cabinets year-round. It’s a terrific way to add a little bit of ‘mood lighting.’ During the winter, I throw some garland up there and leave it to look festive. I usually leave the garland up all winter until about March, as it is just pine garland with pine cones and some snow.

Garland and white lights

Do you have stairs? Wrap them around your banister! Drape them through your house plants, whether real or faux. Do you have a ficus tree? Stick some in there!  Your house will look like a winter wonderland in no time!

3. Less is more.

Let it snowDon’t feel like you need to put everything you own out. Often, a little sprinkled around looks better anyway than if your house looked like Christmas threw up in it.

During the Great Basement Clean Out, I emptied about 10…yes, 10..totes full of decorations I’d accumulated over the years. I could have decorated 3 houses! With so much stuff, it’s no wonder decorating was an overwhelming task. I kept all my favorite things, and still didn’t put everything out. I didn’t feel like I needed to.

Less is more


I placed some of my favorite things around the house, like this little snowman guy who looks perfect sitting on this table. Nearly everything in my house I have decorated you see in these pictures.

Put out just a few of your favorite things, or let your kids pick out a favorite. Everyone will think your house is tastefully underdone! And simple. And elegant.

4. Be quirky!

Quirky!Don’t be afraid to put things in unexpected places.

This stuffed moose is one of my favorites, but for the life of me I couldn’t think of a spot for him. So I sat him on top of the armoire, where he can nonchalantly survey the landscape. That pine tree, by the way, is faux. And it has patio lights in it.

It was downstairs in the bar, but got squeezed out by a neon light. The tree looks great here, and really adds something to the room. I will say he’s suffered a bit from all my repurposing and moving around, so I think here he’s going to have to stay.

Even Morty the Moose gets gussied up! I put a Santa hat on him every year at Christmas. Unfortunately, the lighting wasn’t good enough for me to get a good shot. I’ve thought about putting lights on his antlers, but somehow, Morty is too dignified for that. 😀

5. Make something you already have festive.

Galvanized pails and pine conesWe don’t do much in the way of a gift exchange, so the bottom of our tree always looks bare. I decided to dress it up a little this year, and picked up several galvanized pails of varying sizes at Tractor Supply. (I love Tractor Supply!)

I already had the pine cones and over-sized ornaments, so it was a matter of placing them around the bottom of the tree. The red you see is actually a sphere with pine cones, plums, ice crystals, and some other stuff.

You know all those ornaments you aren’t putting on the tree? Fill a beautiful crystal bowl or candle holder with them and use it as a centerpiece. Or fill some pretty baskets with them and place several of them under the tree. Or collect some pine cones and do the same. I actually had collected these you see in the picture during my crafting days, painted and glittered them.

All these are easy Christmas decoration ideas that anyone can do, and they aren’t time consuming. With this approach, all you need is a few minutes here and there. Don’t be afraid to try something a little bit different; I rarely do the same thing twice, mostly because I can’t remember from year to year. You might be surprised at how something fresh (and easy!) can be a holiday pick-me-up. 🙂 Good luck!

My Struggle With Time Management

This week, I looked at the calendar and realized how long it had been since I’d blogged. Where did the time go? lol   🙂 You would think that someone who was edumacated and a smartie-pants would instinctively know good time management, but no, life doesn’t work that way. 


All My Lists

I am always looking for better ways to do things.

For instance, I love lists. (See the picture above?) That’s all my lists.

When you’re self-employed, you become in charge of your own schedule. And since what you put into your business is what you get back, it’s important to be productive and maximize your time working so that you can truly enjoy your downtime and have fun, rather than play guilty. 🙂

If you also happen to be a visionary, it’s even worse. The curse of being a visionary is that you can see the big picture of what needs to be done. Thus, life becomes one big ‘to do’ list!

If you’ve been a regular reader of my blog, you might remember that I have a constant  stream of non-punctuated sentences running through my head on any particular day. To keep my mind  as quiet as possible, I write it on a list, and then I can forget about trying to remember it.

Did I mention I love lists?

Anyway, I have a lot of lists, all of which I use, and all of them are different.

I have a list for large projects that I plan to work on when I have time.

Big Projects


A list for the projects I want to do at home.

House ProjectsA shopping list for decorating projects.

Decorating ListMy Master List, from which I make notes of things I need to do. I check this frequently, and pull items to complete from it when I have time.

The Master List

My calendar even has small lists or reminders along with appointments. (And by the way, my calendar has to have pages with the months, because I like to see my month laid out in front of me…and space to make lists on the weekdays. 🙂

Calendar

This does not include my grocery list, Wal-mart list, and shopping list for any time I’m at Sam’s Club or Kohl’s. (Yes, those are separate lists.)

Can you tell I love lists?

So a few weeks ago, my schedule began to ramp up, and I began to worry that I would forget things. I was wearing myself out trying to remember what I didn’t want to forget!

With a desire for efficiency and productivity paired with the satisfaction of crossing things OFF lists once they were done, it seemed totally natural to start making a daily list of appointments, errands, and tasks.

Wednesday List

The theory seemed simple: I always carry a notebook with me which has most of my lists. When I had extra time in my day, I’d move over some things from my Master List.

It totally ramped up my productivity!

I was a Rock Star! I was getting so much done each day: tasks that had been lingering on my list for weeks were suddenly getting done. Errands were getting ran. I was crossing things off like crazy! It was awesome. I was like the Tasmanian Devil, spinning through the day.

Yesterday List

I was also more stressed.

And I wasn’t happy. I wasn’t having any fun. Life suddenly felt like one big “To Do” list and I realized I simply wasn’t enjoying my days near as much. Was this all life was??

And then, one day this week I had an hour of uninterrupted time where there was nothing else I could do but wait. So I started reading through a backlog of emails.

Dr. Alan Zimmerman is a motivational speaker. I’ve subscribed to his newsletter for years, “Dr. Zimmerman’s Tuesday Tip.” It just so happened the topic of it was “Time Management Strategies.” For a list-maker, this was going to be eye candy.

As I read it, I realized that I’d been working very efficiently, I hadn’t been working very effectively.

I’ve excerpted parts of his newsletter here, in italics:

The true basis of time management … and therefore life management … is knowing which targets to focus on.  And one way to do that is to apply the 80/20 principle.
 
The 80/20 principle states that in many situations about 20% of what you do yields about 80% of the results. With a typical to-do list of ten items, the 80/20 principle suggests that two of them will yield about 80% of the value.  The remaining eight will yield the remaining 20%.
 For example, Peter A. Turla, a former NASA engineer on the Apollo moon-rocket design team, found that 20% of your customers give you 80% of your sales.  (Concentrate on those customers.)  20% of your customers make up 80% of your complaints.  (Keep your perspective.)  20% of the inventory gets 80% of turnover.  (Keep these items well supplied.)  20% of the house gets 80% of the dirt.  (Clean other parts less frequently.)  20% of your friends call you 80% of the time.  (Call them back at your convenience.)  20% of the newspaper has 80% of the news.  (Skim the rest.) 

Hmmmm. This made a lot of sense to me! I was interested to read more.

I hate to say it, but there is never enough time for everything in life.  One of keys to success is to spend your time on the really valuable things instead of the low-payoff activities. 

 Quite often, things that have a high payoff do not have a high urgency. They are things that would be great to do … like investing in your team’s development, building a stronger marriage, or getting yourself in better shape physically and financially … but are easily put off until later.  Don’t fall into that trap!

In other words, you can’t increase your time, but you can increase the value of your time just by defining your objectives.  A specific destination … or set of targets … will motivate you more than aimlessness will, and when you’re motivated you automatically use your time more effectively.
 
So I challenge you … right now … to choose your targets.  Select your high payoff goals or objectives.  Write them down.  And make them as specific as possible.  

Suddenly, a one-million candlepower light went off in my head. (And those do exist, I have one.) 😉

I realized that I was so addicted to crossing things off my list – being productive – that I wasn’t focusing on the high-priority items: the things that really meant a lot to me and that I enjoyed. The highest priority work, which I should do first, was getting pushed back by the smaller stuff; leaving the bigger things unaddressed raised my stress level. For instance, blogging is a high-priority item for me…but I was pushing it back to accomplish other, smaller objectives.

This light-bulb moment totally refocused the way I do my daily planning. Now, I focus on my high-priority, high payoff items first. The details can come later, as I have time. Because I will never get it all done.

I still have my daily list; I just now focus on my high-priority items first. And, I’m MUCH happier. And you know what? I’ve gotten some things done since then that should have been a high priority months ago. They just weren’t urgent. And I feel good, because by doing them I helped advance my business. Funny how that works. Life is good. 🙂

The Poston Project: A Downstairs Update

This was a case of a family who loved the house they were in; they were Beth was just ready for a change. 😉 What they needed most was someone who could objectively give them some ideas and to help keep everyone’s stress level on the manageable side. That’s where I came in.

When you’re living in the midst of a home remodel, it can be very stressful. I managed to stay married and speaking to my husband after several of them, so I know it can be done. Although I can neither confirm nor deny that there may, or may not have been, meltdowns which occurred during the process. HA

Sometimes, just simply getting started – or knowing where to start –  is the overwhelming part!

So without further ado, here’s the scoop. 😉

The Kithen Before

If you looked at the photo album on Facebook, you know this is the kitchen before.

Beth and Bobby actually remodeled the kitchen ten years ago when they moved in. They were Beth was overall pretty happy with the kitchen, just wanting it painted and a new backsplash.

Beth has a clean, uncluttered style without a lot of extra stuff. (When I say a ‘clean’ style, I’m not referring to the state of cleanliness of her house – although she is that too! – I’m actually referring to the fact that she prefers ‘clean lines’, without ornate styles or patterns.)

What amuses me about this picture is two things: the wallpaper actually makes the kitchen look cluttered. And, you don’t really notice the cabinetry; you notice the wallpaper, and the white fridge.

The Kitchen After

The rich, beautiful color is now the focal point of the kitchen. You may notice one other small change: during the remodel, her microwave died, so she switched it out for a matching white one. Now if that stove would just die… 😉

Because successful marriages always involve compromise, we ‘blended’ their favorite colors for the accent walls. Bobby loved burgundy; Beth loved red. So we looked for a modern combination of the two, and found Behr’s Wine Tasting. While it looks a little more red in the photos, it’s a little lighter than a nice Merlot.

Beth and I joked that we would never forget the name of the paint color. And then I forgot it. But that’s probably because I drink white wine.

Beth chose a multi-color gray glass tile backsplash. They are small tile pre-set into 12 x 12 sections, so you don’t have to apply one small tile at a time. This dramatically changed the look of the kitchen, and ties together the countertop and the existing gray tile floor.

Because there was very little open wall space in the kitchen, we painted all three walls. Not only did it make their cabinetry POP (she’s been asked if she got new cabinetry!), but it also makes the kitchen look much brighter and warmer. Their new French door now makes a beautiful picture frame for their very pretty back yard.

The Family Room Before

I think the most dramatic change is in the family room.

Beth’s instructions to me were to leave the fireplace as is, or maybe paint it; they were going to eventually tear it out someday – if they added on the back of the house – because they had not been successful in getting it to work properly.

I couldn’t stand it. Fireplaces add value to your home; the minute you tear one out, you’re taking value away. Besides, think of how many family memories are created around a fireplace! Stockings at Christmas, a mug of hot cocoa in the winter, curling up in a cozy chair with a book and a glass of wine (wait, maybe that was me), etc.


The Family Room After

Fabulous!

The ‘Bamboo’ laminate flooring and the oak cabinet-grade built-ins (built by Dwayne Lawson) completely transformed the room. The room only had the one window, so we added lighting in front of the cabinetry. These, and all the other walls, are Behr’s Pecan Sandie.

Or maybe the archway is my favorite.

Divider Wall Before

If they removed this whole wall, they would lose the wall space, and the ability to place furniture there. I suggested several ideas, and showed them some examples. Reid sketched their favorite; now they wondered how they lived without this counter all these years!

 Divider Wall After

The Bar

I love the bar stools! And now you can have a snack or be in the kitchen and see the TV, or just simply feel like you’re a part of everything!

 The bathroom was made much more spacious just by simply reversing the swing of the door. It had quite possibly the leetlest vanity I’ve ever seen! We replaced it with a larger one that made sense in the space and dressed it up a bit.

The Bathroom Before

And the wallpaper went away.


 The Bathroom After

 Now, a downstairs bath that’s proud to meet guests, no matter which side it sees. 😉

And then there’s the living room. Maybe that’s my favorite.

The Living Room Before

We took a room with no clearly defined purpose, and gave it a new life.

Several years ago, the family lost their finished basement, which served as a family room, to a flood while on vacation. They were down to one TV room, and the living room was being used as a computer room and office.

The Living Room After

Fabulous! The bamboo floor is also in here, with a large area rug to make it cozy. Reid added an overhead light and cable, and now this has become daughter Katy’s favorite room to do homework.

The accent wall not only gives the room its Wow Factor, but it will also look fabulous from the outside. (Have you ever thought of how your room might appear from the outside?)

And the new spindles on the stairway? What a fabulous change that is! Reid ran the bamboo up the stairs, but added a carpet runner, which will really make it easier to clean. Fabulous!

The Stairs Before

What.A.Difference.

The Stairs After

And did I mention that the top of the railing and the main post stayed the same? It looks fresh, clean and uncluttered. Traditionally modern. 🙂

One thing I didn’t mention is that we also switched out the original doors, which were flat hollow core, for 6-panel oak doors. Reid did a terrific job of matching the other woodwork. They say life is in the details, and a remodel is no different. Updating the doors made a huge difference.

If you want to see a little more realistic view, you can watch the visual tour here: http://www.visualtour.com/show.asp?T=3169754.

Thank you, Beth and Bobby. It was a terrific project, and we’re glad you love it. I had a blast! 🙂


Cleaning Out My China Cabinet

I’m sure you’re wondering where I’ve been and what I’ve been up to.

What I can tell you is that it’s very hard to be creative and insightful when life’s abundances happen all at once and it begins raining metaphorically.

Just as I began to “settle in” to our new office at the shop, my real estate business picked up. It’s incredibly gratifying to help my friends and clients make what may be their biggest and most important move of their lives.

I love, love, love my Master Gardener class, which is 3 hours one afternoon a week. And I have homework! GASP!

Of course, there’s volunteer  work to be done.

Then my father-in-law had to be hospitalized, where he received a pacemaker.

I drove my dear friend Sophia to Columbia (Missouri) to see her mother in ICU one day.

We were thrilled that our good friends from Kearney were able to come up last weekend.  My husband was one meat-smoking machine before they arrived! Then there was more smoke, and fire alarms, and calls to Central Dispatch to tell them to please disregard any fire alarms from this address. And Macaroni and Cheese that tasted like Hickory Smoked Mac & Cheese. (But that’s another story).

So, apparently I was amped up from the busy last few weeks of work; last Sunday I had the overwhelming urge to clean out my china cabinet. And it had to be done right now.  I’m sure that happens to everyone. Doesn’t it? Please?  😉

This is my china cabinet. It’s one of my favorite pieces of furniture in our whole house. And versatile. It has served as a bedroom “dresser”, a linen closet, and now a china cabinet. I think I’ll keep it. Who knows what I might morph it into next?

My China Cabinet

It is filled with beautiful things that I almost never use anymore. We live a very casual lifestyle, and I am quite happy with this.

My grandmother’s china and crystal I am saving for our nieces, who haven’t picked it up yet. (Ahem!) 😉

Grandma's China-Before

Grandma’s China-Before

Gifts given to me by beloved friends I will keep and treasure, as well as heirloom pieces that have been in my family for several generations.

However, I have a few pieces that were given to me years ago by people with whom I’ve completely lost track of, as well as things I’ve purchased that I no longer use or like. I have a dear friend who’s daughter is collecting things for her future apartment. Perhaps I can bless her with some of these things.

I have no idea why I somehow felt this particular need to start this project now. After all, it’s not anything that can be done in one day (especially by the time I wash everything I’m keeping!) So this is what my kitchen looked like last Sunday.

My Messy Kitchen

My Messy Kitchen


Sometimes I think it must be my version of ‘nesting’. When life gets out of control, it brings me a certain degree of peace and comfort to bring order to what I can control. This would, of course, be my house.

For me, it’s a soul-soothing process to bring order and beauty to something that’s cluttered. It feels so good to open a cabinet door and have the space be pleasing to my eyes. Ahhhhhh.

This also means that my kitchen is a form of chaos until the project is done. But if you aren’t spending that much time there, you really don’t notice.

The Kitchen Counter

The Kitchen Counter

So today I finished washing all the china and putting everything back in. Did you know that you can actually put your china and crystal in the dishwasher? Yep. I loaded up the dishwasher, WITHOUT soap or rinse agent, and set it on the delicate cycle. Perfect!

After

It’s done. Doesn’t it look nice? Ahhhhh… 🙂

Creating an Open Floor Plan

Before Wall Demolition

Before Wall Demolition

I love houses. I love everything about them. I love organizing them. I love decorating or staging them (I’ll explain the difference between the two in a later post.) I love making them feel like home.

Most of all, I love BEING at home in my own! But that’s the way it should be.

If you aren’t loving being at home, then there’s some tweaking that needs to be done somewhere.

A friend of mine contacted me recently; she and her husband loved their home, but wanted to give it an updated look. They had several things they wanted to accomplish with this remodel.

My mission: to create a fresh, timeless update that my overwhelmed friend would love, her husband who hated change could be on board with, and would suit their lifestyle and their expanding family for years to come.

This was the perfect project for the new Stanton Contracting Design/Build Division; our partner, Reid Yardley and I collaborated on their remodel. (Reid always makes my ideas even better.)

I promise I will post the complete series of Before and After pictures when it’s complete. In the meantime, the remodel is a surprise for a family member, so I can’t tell you who the client is. Yet. 🙂

One of the things the homeowner wanted to accomplish was creating a more open space between their kitchen and family room.  While open floor plans are pretty much the standard in most new construction and remains in demand by buyers, often you can re-create the feel in an older home.

Simply knocking out a wall and leaving a half-wall opens up and makes for a ‘friendlier’ space. The impact of a wall demolition in a room can really give you a lot of ‘bang’ for your buck!

In the Before picture, the wall divided the kitchen and the family room. The pillars, which were original to the house, make the room look dated.

After Wall Demolition

After Wall Demolition

The After picture was taken shortly after the wall was removed. Clearly, there’s work to be done. But look at the difference!

Reid will be installing a countertop on the half wall, and the kitchen will now have a little ‘nook’ in which to sit down and have a snack. It’s very on-trend right now to have countertops that coordinate but don’t exactly match if you have a kitchen island or bar.

The half-wall will still allow the homeowner to utilize that space for furniture, a necessity when the room’s dimensions are smaller and you need the wall space.

Our design calls for an archway with pillars on either side over this space, which will make a nice visual transition between the two rooms.

Today marks the transition for the homeowner from the ‘demolition and removal’ phase to the ‘reconstruction’ phase. This is the fun part! Each day when the homeowner comes home from work, there will be something new to see.

I can’t wait to see the finished project! 🙂

The Finished Flowerbed

Finished Flowerbed Can I just say that right now I am in Project Heaven?

I work best and am happiest when I can work like a butterfly. And sting like a bee. (Sorry, I couldn’t help myself. Or was it ‘move like a butterfly, and sting like a bee?’) My apologies if you aren’t old enough to remember Mohammed Ali. But I digress.

I am happiest when I am juggling multiple projects and can flit from one to the other, whether it be work or play or work at home.

Anyway, the flowerbed is done. *Happy Dance!*

I did not enjoy it.

But doesn’t it look nice?

I have one blue fescue plant that is struggling; it’s a sun-loving plant that was living in the shade at the store. And of COURSE there was no other blue fescue in town, so I’m hoping it will come out of it.

I typically go with a color palette of pinks, purples, and white, and a variety of textures in my landscaping. Easy on the ornaments.  I’m liking the look. Just in case you forgot what it looked like before, here is the ‘before’ shot.

Front Flowerbed The perfectionist in me crept in once. I realized I there were a couple of plants that I should have moved a couple of inches a different way.

Two inches.

Dig up a plant on a hot day and move it two inches? N.O.

I got over it.

Then I really got over my perfectionism when I sent two men to the store to pick up pea pebbles for me. Graciously, they complied. And brought home two different colors of pea pebbles. (!) Fortunately, it takes a lot of pea pebbles.

After I was done, I realized it didn’t match the pea pebbles in the other bed.

Who knew there were so many colors of pea pebbles?

I didn’t need it to be perfect, I just needed it to be done. Chances are, you would have never noticed it didn’t match the other bed.

Now I’ve made you want to look. 😉

Time to celebrate! 😀