The Flowerbed Makeover, Step 2: Painting the Foundation

Before Restore

Before Restore


It’s supposed to be really nice this weekend. Like, gorgeous. Weather like this is a DIY’ers dream.

So in honor of that, I thought I’d share this terrific project idea to really give your house some Curb Appeal. Not only will YOU like the look, so will buyers if you happen to sell your house at some point in the future.

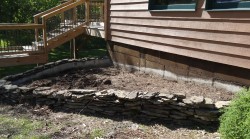
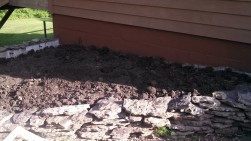
This is the flower bed after I tore out all the flowers, weeds and mulch. See how ugly that exposed foundation is?

You can see it actually has a dark color of stain on it: it had fallen victim to a failed project to stamp the wall to make it look like stone. A great concept, it just didn’t work well in reality. (Meaning, it required both of us.)

When we had the deck enlarged last summer, we had our contractor paint our exposed foundation with Restore. We just hadn’t done this part. (Honestly, I don’t think we thought about it. You really didn’t SEE it, and you know how it is when you don’t see something…)

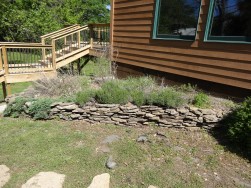
On a recent weekend, I used our leftover Restore to paint this portion of the foundation in the picture shown below that had now been exposed.

I did not enjoy it. But I love, love, love the finished product!

"Restore'd" Foundation

“Restore’d” Foundation


Restore makes it look a little bit like it’s been stucco’ed. It gives it a solid texture, and helps fill in cracks or small holes.  Restore is made by Rust-Oleum, comes in several colors, and is available for decks or concrete.

If you’re painting concrete,  make sure you purchase Restore for Concrete. The Deck Restore is not thick enough to stay on a vertical wall.

Behr also makes a similar product for both decks and concrete, called Deckover. It comes in 54 colors, according to their website.  Either of these should be readily available in your local home improvement store.

We have a walkout basement on our addition, so a great deal of our foundation is exposed. It required one Home Depot and two Westlake’s to get us all we needed.

It goes on very thick, so you’ll use more than you would if you were simply painting or staining the same surface. It uses special rollers to give it the texture.

It is messy.

So make sure you wear shoes and clothes that you really don’t care about. And use plastic to cover up your patio or your nice landscaping.

Here’s a tip: Because Restore requires 3-6 hours to dry, if you decide to paint one coat one day, and the second coat the next, wrap your rollers in plastic and stow them in the freezer overnight. I highly recommend tossing them when your project is complete. These aren’t rollers you’ll be using again. And, be sure to use some blue tape to protect your siding.

Ladies, I recommend wearing plastic or latex gloves to protect your manicure. Ask me how I know this. 😉

Happy Restore-ing! 🙂

The Sangria Recipe

Delicious Sangria!

Delicious Sangria!

Here’s the Sangria recipe, as promised. This was fun to make, yummy to drink, and made a beautiful presentation!

I would really love to tell you that I created this recipe; it’s more like, I kitchen-tested this recipe for you. 🙂

I’m a huge fan of Ree Drummond, The Pioneer Woman (www.thepioneerwoman.com.) All her recipes are simple and delicious. Every time I make one, it’s like I hit the ball right out of the park. So this is one of Ree’s recipes. Thanks Ree, for making my life so much easier.

2 Granny Smith apples, cored and cut into cubes

1 cup green seedless grapes

1 cup red seedless grapes

2 cups pineapple chunks (I used canned for this, fresh was too much trouble and too expensive!)

1 small unpeeled orange, thinly sliced

2 unpeeled lemons, thinly sliced

2 unpeeled limes, thinly sliced

1.5 liter red wine (such as Cabernet, Merlot or Pinot Noir)

1.5 liter dry white wine (such as Chardonnay, Sauvignon Blanc, or Pinot Grigio)

1 cup orange-flavored rum

1 cup orange-flavored vodka

1 cup sugar

When it came to purchasing the wine and spirits for this, I followed same rule as using wine for cooking: “If you buy a cheap, crappy wine to cook with, it’s going to taste like cheap, crappy wine in your food.” So I looked for something that was good quality but yet reasonably priced.  For the wine, I bought Robert Mondavi’s Woodbridge Pinot Noir and Sauvignon Blanc. I bought Absolut vodka, and Parrot Bay rum.

Place all the fruit in a large container. Start pouring the liquids: the wines, followed by the vodka and rum. Finally, to add a subtle sweetness, dissolve the sugar in 1 cup of water and add it to the mix.

Stir well, cover and refrigerate for several hours, giving the fruit and liquids time to “steep”. Serve in glasses over ice. The fruit is also delicious to eat!  Your guests will think you ROCK. And so will you, if you have too much.  😀

Groundhog Tales: Chapter 1

The Newest Groundhog

The Newest Groundhog

Yes, that is really a groundhog in our mulberry tree. Apparently, groundhogs are really related to squirrels. Who knew?

The Stantons have a rich and storied history with groundhogs.

In September, 1998, I moved back here from Las Vegas, Nevada to be with Jimmy and start our lives together. After 11 years of desert living, where winter lasts about 2-4 weeks and then it gets warm-warmer-HOT, I was completely in love with experiencing Autumn again.

We especially enjoyed watching the roly-poly groundhog, as he lumbered around our yard stuffing himself with acorns in preparation for a long winter’s nap. We were temporarily dog-less, as my girls were still in Las Vegas with my parents for a few months until I got all settled in back here.

So Mr. Groundhog had free rein; he came and went, and we enjoyed watching him come and go, his increasingly rotund body going about his business. He was so cute!

And then he moved in under our front porch.

Our front porch sank several inches on one side as his tunnels got larger. And our basement began to leak when it rained.

Concerned, I called my friend’s dad, who worked for the conservation department at the time, and asked him what to do.

Always a man with a sense of humor, Hollis replied, “Oh, just wait a few weeks, he’ll go to sleep and you’ll never know he’s there.” There’s a comedian in every crowd, isn’t there? LOL

One Saturday I came home after being gone most of the morning. A house full of smoke greeted me when I opened the door.

“What happened?” I was horrified as I looked at Jimmy sitting on the couch.

He was green.

“I was trying to flush out the groundhog, so I put two mole smokers into his tunnels under the porch. I feel sick,” he said weakly.

Fortunately, as soon as I opened windows and the air cleared, Jimmy’s complexion returned to its normal color.

And apparently, it was enough for Mr. Groundhog too, because he moved out from underneath the front porch. We assumed he’d gone back into the forest and found somewhere else to live.

But you know what happens when you assume things….

PROJECT: A Flower Bed Makeover

Front Flowerbed

BEFORE

Over the years, my landscaping has taught me one thing over and over:

“Low maintenance” does not mean “No Maintenance.”

Take this flower bed for instance.

The grasses were overgrown.

Some of the plants were dead.

Some of the plants I wondered what on earth possessed me to pick THEM? What was I thinking?

Why did I let myself be talked into cedar mulch?

Why did I let it go so long?

Is it too early for a drink? (Just kidding, not really. That came later.)

It had reached the Point of No Return: the best plan, I decided, was to rip it out and start over. The “over” comes later. You’ll have to stay tuned.

I did not enjoy it.

The cool thing about being married to a contractor is the toys that come as part of the package deal. I had most of it ripped out, and Jimmy brought the backhoe and helped me with the rest.

5 years worth of plants, mulch, and landscape fabric discarded: $235

Backhoe fuel, additional black dirt, and ruined pair of shoes: $122.50

Co-Pay for back adjustment after ripping out flowerbed: $35

Having all this ugly crap gone: PRICELESS! 🙂

A Great Party Idea!

CheezItI learned this valuable tip during my college years. (This was early on in the 12-year plan.) Clearly my dad was an optimist. He kept allowing me to go.

Oh, the memories of being a sorority pledge.

I hope I don’t go to Sorority Prison for telling this long-kept “secret.” Man. That would be terrible.

As lowly pledges, we all did this to earn the highly-coveted status as “Active”.

If there was more than one pledge at a time in the Chapter Room serving them, the room was a harmony of “Cheez-It?’s”.

This would be a great conversation starter at your next party. Or hey! What a great activity for your kids!

It’s very simple to prepare:

Buy a box of Cheez-Its.

Straighten the hook end of a wire hanger. Thread the Cheez-Its on the hanger.

Place the hanger on your head, with the Cheez-Its in front.

You (or your kids) then approach your guests, one by one. Tilt your head, so the Cheez-Its are within reach, and ask them if they’d like a Cheez-It.

In those days, the Actives had to eat the Cheez-Its directly from the hanger. That could be a little tacky at a cocktail party.

The bounds of sisterhood go far and wide. Even to Gulf Shores. And balcony stories.

Here’s to memorable parties, laughter, and sisterhood.

CheezIt? 😀

Magical Moments In Gulf Shores

Balcony Sunset

I always feel more interesting after I travel.

I don’t know that I actually am more interesting afterwards. I just feel it. Maybe it’s the sights I saw. Maybe it’s the food or the cocktails. Or maybe it’s the fact that my family is on their best behavior when I get home. Jimmy even makes the bed.

This usually lasts for about three days. Then it’s like I never left. 😉

Have you ever noticed that when you get back from a trip, whether it’s vacation or business, there are always certain memories or impressions that stand apart from others?  While the whole trip was awesome and fun, parts of it fade from your memory eventually, but these “chosen moments” are the ones that stay with you forever.

I call these “Magic Moments”.

And these moments are usually things that seemed like no big deal at the time. It’s later you realize how special they were.

My favorite Magic Moments from my trip to Gulf Shores are in no particular order, except the first one is my favorite.

1. Peggy, Kathy and I sitting on our hotel room balcony the first couple of nights there, having cocktails and laughing so hard we nearly peed our pants.

Okay, I nearly peed my pants. I won’t speak for anyone else.

2. Eating marinated crab claws at LuLu’s. The visual eye candy of all the colors, the waterway, the food, the drinks. And where post-margarita shopping was a blast.

3. Eating lunch at The Gulf, an outdoor restaurant made from recycled shipping containers, furniture made from recycled lumber, looking out over the white sands of the beaches filled with loungers that make me drool. (I have a serious addiction to deck furniture. My husband will tell you.)

The lady in front of me asks the cashier, “What do you do when it rains?”

“We get wet.”

And post-mojito shopping in their retail space. (Hmmm. I sense a theme.)

4. Saturday afternoon at Bucky’s at the Grand Marriott in Point Clear. We sipped mojitos while watching a wedding, resisting the urge to stand up and object. The bride’s father carrying a large, over-sized margarita.

He probably needed it. It was a really big wedding complete with a small orchestra.

Watching all the guests arrive, the young women walking across the grass in impossibly high heels. “That looks like two raccoons wrestling!”

Note to self: always look at my backside in the mirror before going to a large public event.

5. Absorbing all the visual “eye candy” at the Grand Marriott: the flowers, Mobile Bay, the grounds, the super friendly staff, the quiet room at the Spa. The hug from the maid. Our really large room.

6. Driving through beautiful, charming Fairhope…the charming stores, friendly people, and delicious food. “SQUIRREL!!!” which then became “PELICAN!”

7. Sunday afternoon at Bucky’s. Having my first (and last) mint julep, more mojitos, and a growing crowd of friends and new friends around our table. It might have been rainy outside, but it was warm and fuzzy inside.

I still have the warm and fuzzies. 🙂

Step 3: How to Housebreak Your Puppy

The Best Cleaner

The Best Cleaner

This is the last in my 3-step series, How To Housebreak Your Dog in 3 Easy Steps!

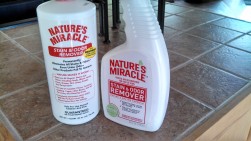
Nature’s Miracle Cleaner

This is the best cleaner ever! My friend Kathy turned me on to this. You can get it at Tractor Supply, and I highly recommend that if you have animals, you keep it on hand.

Not only does it clean, but it also removes the odor so they don’t keep using the same spot over and over. You simply spray, wait a few minutes, then clean it up.

It is an enzyme cleaner, which removes even old deep-set stains and odors. It’s also safe to use around kids and other animals. You can use it on furniture and clothing too!

As you can see, I keep the handy refill size on hand at all times. If I had carpet (other than rugs), I would probably try to order it by the gallon. Because while my girls don’t have accidents often, when they do, it’s a doozy.

Like the time Ekko decided to “educate” her dad that when she “told” him she wanted to go out, he shouldn’t ignore her and get in the shower. Lucky him, he got to not only clean the rug, but also Ekko…and the sofa. 😀

Step 2: How to Housebreak Your Puppy

Charra in Her Crate

Charra in Her Crate

This is the second post in a series of three to help you housebreak your dog fast!

BUY A CRATE.

Let me be clear.

Crate-training is NOT cruel.

Crate-training helps them stay in your home forever.

Crate-training gives them security and protection.

Really. Their crate becomes their safe spot when they are scared or simply tired and need to rest. (Doesn’t everybody need some quiet time once in a while?)

Assuming you are progressing with Step 1, keeping your dog on a regular routine, Step 2 will be a breeze.

At bedtime, put them to bed in their crate. Do NOT put food or water in the crate! They aren’t going to die overnight.

When you leave for work, or errands, put them in their crate. Do NOT put food or water in the crate! They aren’t going to die while you’re at work.

Leave them with a toy and a hoof or something to chew on. Puppies NEED to chew, it’s an important part of their development and, with the appropriate hoofs or bones, will help keep their teeth clean.

I don’t usually let them have toys at night, especially noisy toys. They need to learn that bedtime is BEDTIME.

During the middle of the day, come home and let them out to potty, or have someone else do it if you can’t be home. Have a parade for them, and give them a little treat when you put them back in their crate. (If you have more than one dog, you should give everyone a treat.) In the very beginning, they may need to be let out during the middle of the night, until they learn to hold it through the night.

For the first few weeks, I usually put just a towel in the bottom of the crate rather than a bed, so that it’s easy to wash. If they are pottying in their crate, the crate is either too big, they have a medical or dietary problem, or they are just not mature enough to hold it for the period of time you’ve required them to.

If your dog is naughty, scold them with a firm “no” and simply put them in their crate for 10 or 15 minutes. That’s an eternity to a dog!

Charra wanted to play with Daisy once, and Daisy objected. Charra informed Daisy that SHE would be the one to decide if, and when they played, and she wanted to play. NOW. And Charra was promptly escorted to her crate to chillax.

When we returned from Florida, I ‘retired’ Ekko’s (formerly Charra’s) crate to the basement. We had crated her for over a year because of a random chewing habit, and she finally grew out of it. She followed me down and inspected it for one last time, and looked at me. She was ready. She was a Big Girl now! And she was proud. 🙂

How To Housebreak A Dog In Three Easy Steps

Ekko's First Picture

Ekko’s First Picture

Some of you may be getting new puppies now that school is out for the summer. This series of posts is for you!

I have a significant amount of knowledge and experience with this topic. Over the years, I’ve housebroken at least 6 dogs of my own, as well as a number of foster dogs from my time volunteering for Field of Dreams Rescue.

My record is two days. The longest actually took several weeks, but then she had some quirks.

Assuming your dog is of average intelligence with no mental issues, is already spayed or neutered (or you have plans to) and doesn’t have any other health problems, you should be able to housebreak him or her in two weeks or less if you consistently follow these steps.

Step 1: Be Consistent!

Dogs love routine. A consistent routine gives them a feeling of security. They know what to expect from you, and that’s how they know when to do what they are supposed to.

The most important thing to do with a new puppy in the house is to get them on a schedule.

Do the same thing, at the same time, in the same place, in the same order, every day. Our dogs go outside to potty in the same order, every day at almost the same time. They are fed in the same order, in the same bowls, in the same place, every day.

In the beginning, puppies have to piddle often! Watch closely for their signs…sometimes they’ll get anxious, or get really wild all of a sudden…until they get old enough to tell you that they have to go. So in the beginning, take them out often. Like, every 30-60 minutes. You’ll soon get to know how often they need to go out. If your dog is a little older, say 10-12 weeks, they can usually hold it a little longer than that. You’ll just have to get to know your dog.

When you take them outside, use the same phrase every time. At our house, it’s “Do you need to go outside and go pee-pee?” Then once you’re outside, use a phrase to encourage them to go (with puppies, it’s to remind them…they are easily distracted!) I always say, “Go pee pee!” Keep repeating it, until they finally actually go. The first time they potty outside, have a PARADE!!!! Lots of love and kisses and hugs.

The next time you go outside, go back to the same spot. EVERY TIME. They’ll quickly get the idea that’s where they are supposed to go. With Ekko, I had to choose my battles. It just so happened the first time she went poopie, she chose my flower bed. SIGH.

What’s more important, housebreaking her, or picking up some pooh from my flower bed? I went with the housebreaking. I’m rewarded for that decision with no accidents in the house, and the occasional opportunity to pick up pooh from the flower bed…still to this day.

While it was about two weeks before I actually felt confident that she was housebroken, Ekko really only had 3 accidents in the house, and that was during the first three days.

But then I’m not counting the time that Ekko educated Jimmy that he should not ignore her and get in the shower when she told him she had to go potty. But that’s another story! 😀


Project: Add An Unexpected Element

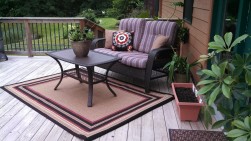
Our Back Deck

Our Back Deck

This is the last post in the series of Quick Outdoor Space Projects that was on ‘rain delay’ from the Monday of Memorial Day weekend.

I spent all day last Saturday sweeping tree debris from our decks and patio and getting them somewhat ‘beautified’ again. The stager in me gets the warm fuzzies every time I see a tidy, uncluttered space that’s balanced. And beautiful!

Every year I do something a little bit different in my outdoor living spaces. It’s good to change things up once in a while.

This year, I added a rug.

This love seat and table used to sit on the front deck, but I moved it to the back this year. In this picture, you can see my houseplants, a square pot that’s going to be an herb garden (this sat on my kitchen counter unplanted for two months, lest you think I’m too ‘Martha’!), and a color bowl that I picked up at Home Depot.

Doesn’t the rug just add a little certain something? It really gives the space its Wow Factor; I know it looks good if Jimmy actually notices!

The big bonus for an indoor/outdoor rug is that they feel like a rug, but can actually be hosed off with a garden hose! When the sun gets really strong in the ‘dog days’ of summer, I will bring it inside to prevent the sun from fading it.

And, it’s perfect to use inside if you have pets. Because no matter how well-behaved your dog is, accidents WILL happen. It’s the nature of the beast(s). 🙂


  • Page 1 of 2
  • 1
  • 2
  • >